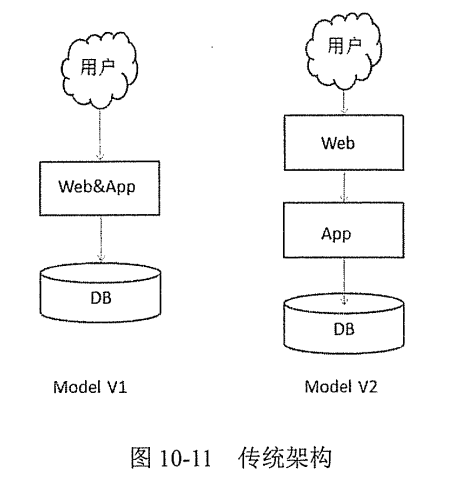
单机架构
单机架构是最原始的传统架构,如下图所示,Model V1中Web服务器和App的服务器直接放在一起,随着业务持续增长,Model V2中把Web和App服务器分开管理,随着进一步业务增长需求,DB也很出现性能瓶颈,Web和App服务器频繁读取文件也会造成IO瓶颈,为了不影响现在业务,于是集群方案就产生
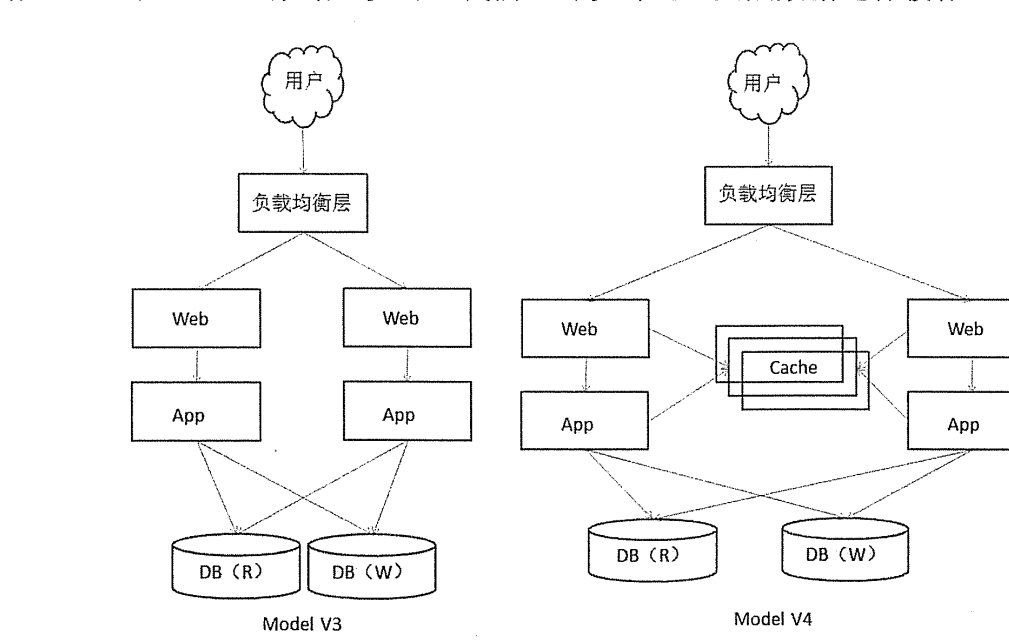
集群结构
- 如图 所示 Model V3 结构 Web&App 服务都可以用多台机器来进行负载分担,DB的瓶颈也可以采用分区、分库、分表的方式来缓解;分库、分区、分表宗旨是减小遍历范围,提高响应速度。
- 还可以采用读写分离的方式来减轻单台服务器的 IO 负担,相当于增加了机器的处理能力。读写分离比较适合以读操作为主的应用,可以减轻写服务器压力,但是读服务器会有一定的延迟。当一些热点数据过多时,我们还可以对这些热点数据进行缓存(Model V4)。
- 对于负载均衡层,目前主要是在 TCP\IP 协议的四层与七层进行负载分发,四层负载流行的有 LVS(LVS 集群采用 IP 负载均衡技术和基于内容请求分发技术,目前互联网公司大量使用,如阿里、京东等)、F5(强大的商业交换机,好处是快、但就是贵),七层流行的有 Tengine、 Nginx、Haproxy、Vanish、ATS、Squid 等。目前互联网企业多采用 LVS+Tengine/Nginx的组合来进行负载均衡。
- Model V3、Model V4 的集群架构基本能够解决多数企业的性能问题,但缺点也比较明显。多个 Web 服务器之间的用户请求状态(Session)需要同步(为保证高可用,如果其中一台宕机,另一台服务器能够正常处理用户请求,专业术语叫 Session 黏滞),这会消耗不少 CPU 资源。另外数据库实现读写分离后,数据同步(数据一致性保证)成为一个性能问题,大量数据的同步 IO 会面临瓶颈。另外业务量大以后,数据的安全保障机制也受到挑战,备份问题凸显,也催生了分布式的发展。
分布式结构
系统分层、系统服务化(SOA 架构、微服务化等)、服务分布式、DB 分布式、缓存分布式及良好的水平扩展能力是当前分布式架构的典型特征:哪一个服务性能不佳直接增加机器即可,性能与机器数量呈线性增长关系,从而解决前面架构遇到的问题。
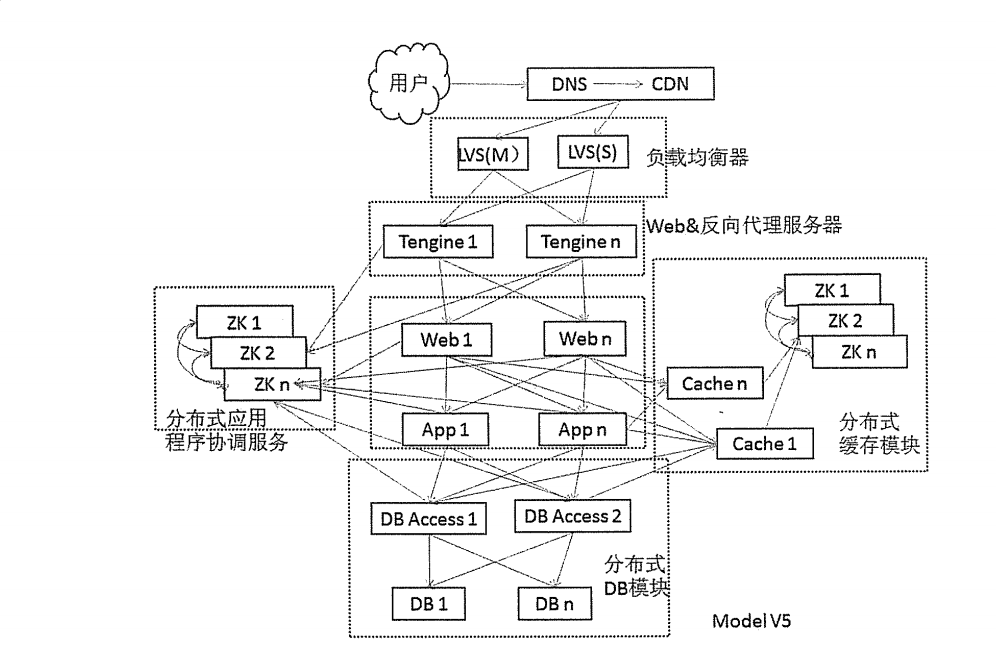
DNS&CDN静态加速
DNS:智能 DNS,用户请求进入后,域名解析服务器智能判断用户请求的线路,如果是电信用户就解析到电信 IP,联通用户就解析到联通 IP。
CDN:用户访问 Web 页面时往往会有很多静态资源(图片、样式、JS 等),而这些资源都是比较耗时的,CDN 服务其实就是把静态页面缓存到不同地区很多台专门的缓存服务器上,然后根据用户线路所在的地区通过 CND 服务商的智能 DNS 自动选择一个最近的缓存服务器让用户访问,以此提高速度,这种方案对静态页面效果非常好,同时它也需要智能 DNS 的帮助才能实现把用户引导到离自己最近的缓存服务器上。
负载均衡器
负载均衡器的作用是把用户请求按一定规则分发到不同的服务器进行处理,在使用负载均衡集群时,分发负载是一件性能要求极高的事情,流行的产品有 LVS、nginx、apache、F5 等。
LVS:LVS 集群采用 IP 负载均衡技术和基于内容请求分发技术,也就是能够在 TCP/IP层的第四层进行请求分发。LVS 调度器具有很好的吞吐率,将请求均衡地转移到不同的服务器上执行,且调度器自动屏蔽掉服务器的故障,从而将一组服务器构成一个高性能的、高可用的虚拟服务器。整个服务器集群的结构对客户透明,无需修改客户端和服务器端的程序。为此,在设计时需要考虑系统的透明性、可伸缩性、高可用性和易维护性。关键一点是 LVS开源而且效率高,相比商业负载工具 F5 赢在免费,而且效率达到 F5 的 60%。
Tengine:Tengine 是一个强大的高性能反向代理服务器,Tengine 是由淘宝网发起的 Web服务器项目,它在 Nginx 的基础上针对大访问量网站的需求,添加了很多高级功能和特性。目前很多公司采用 LVS+Tengine/Nginx 的负载架构来构建自己的负载均衡部分
Web 服务分布式集群
- Web:Web 服务层,按照 MVC 的设计理念 Web 服务层主要是进行页面渲染,Session 保持等工作。这些应用部署在诛如 Tomcat、Jetty、Jboss 这些容器上。图 10-13 所示为一个典型的分布式 Web 结构(已经简化),Client 请求通过前端负载均衡器(比如 LVS+Tengine)分发到 Web 层,Web 层通过 ZK(Zookeeper)注册中心找到提供业务处理(App 层中的某一个节点)的节点。Web 层请求传送到 App 层的路由由负载算法(用程序实现的负载路由)来实现通常叫软路由,它能够把请求按一定规则分发到 App 层的各节点上,Dubbo 框架中就内置了这样的软路由。
- 对于 Web 层来说,请求会话状态(用 Session 来代替)的保持是一个问题,Session 同步是一个容易引起性能的地方,在分布式框架中一般会把 Session 信息独立出来放到缓存设备中,比如用 redis 来存储 Session 信息,当然大量的以亿来计的 Session 信息如果保存在一台或者少量几台 redis 中也会造成风险,首先是需要一个大的内存来存储数据,另外要考虑到数据安全,当服务器挂掉后数据如何恢复?想想一个200G 的 redis 数据集想恢复得花多长时间,本着风险分散原则,还是拆分成多个 redis 节点保险,所以 redis 分布式集群也变得很有必要。不少互联网公司会在 redis 之上加上一个中间层,来构建分布式缓存服务
App 服务分布式集群
- App:应用服务层,实现主要的业务逻辑。应用服务不仅在单机上要具备更优的性能,在结构上要易于水平扩展,功能服务化且服务无状态。比如我们网购,选择商品准备结算时,如果没有登录会跳出登录框,提交登录请求会调用会员系统进行身份验证,这是一个服务;会员系统调用账务系统查询余额是另一个服务。这些服务部署多个,任意一台处理请求返回结果都一样,这样就具备良好的水平扩展能力。当遇到某一类服务性能吃紧时直接增加机器就可以了。Dubbo 就是经过实践验证的使用广泛的分布式服务框架,具备良好的水平扩展能力
分布式缓存
- Cache:缓存数据到内存,解决热点数据问题。比如 redis,memcache 等缓存产品。在内存中存储数据时不可忽视的问题是数据的安全性与存储量,当前解决数据安全性的方法主要是数据持久化与数据冗余(主从缓存服务器结构,为了性能会进行读写分离);解决存储量的问题主要是分而治之,进行分布式存储,每一个存储节点我们叫做分片,比如100G的数据我们分5个片区来存储,每个分片就是20G。
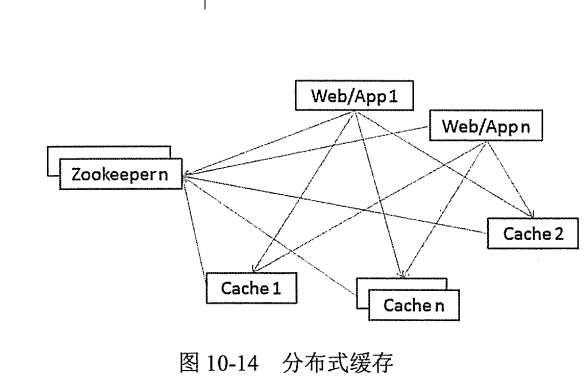
- 图 10-14 所示常见的分布式缓存架构,Cache1 与 Cache n 构成分布式缓存集群,以 redis 为例(比如 Cache1 由 redis 担当),Cache1 是一个分片(物理节点),Cachen是第n个分片(物理节点),redis 以(Key,Value)结构存储数据(有关redis 的知识请自行查阅相关资料)。
- Web/App 服务先从 Zookeeper 中心取得缓存服务器访问地址(比如 Cache 1 地址),然后向缓存服务器发起请求(读、写、修改)。缓存服务器由 Zookeeper 来提供一致性服务,这样很方便对缓存服务器数据进行冗余(读写分离),保证数据安全,提高访问效率。当缓存数据过多时,可以水平扩展来提高服务能力。
- 分布式缓存不仅解决热点数据问题,有些企业直接用其作为数据持久化介质,比如秒杀分布式缓存在整个分布式架构中是重要的组成部分。
分布式数据库
- 传统集中式的数据库结构随着数据的激增,为提供良好的用户体验的成本越来越高。对于海量数据基本是分区、分表、读写分离这些手段,海量数据的访问使得对 CPU、内存、硬盘的要求更高,最后依然是无法突破瓶颈,我们并不能生产出更强的服务器,暂时办不到,也没必要,就像我们搬不动一堆东西时,我们可以分开搬,也可以几个人一起搬。所以我们可以分而治之,用普通的 PC 来做高端服务器的工作。
- 分布式数据库是一种趋势,用廉价的普通 PC 设备堆叠出具备高可用性、高扩展性的服务集群,正如本章开篇中说到的去IOE 化,摆脱对大型设备的依赖,减少运营成本,提高服务能力。
以上知识抄录于<<全栈性能测试修炼宝典JMeter实战>>
什么是反向代理服务器
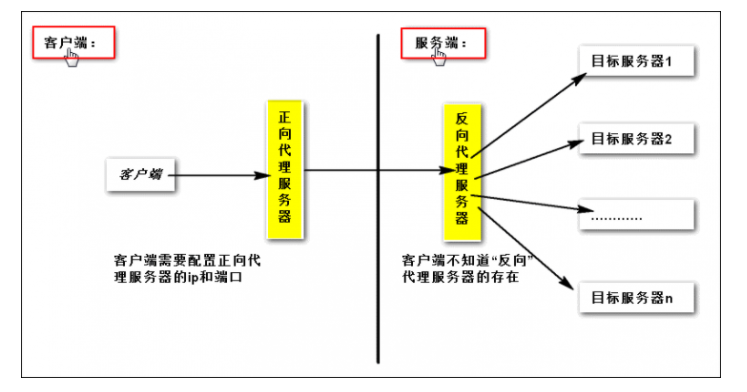
‘反向代理服务器’ 有两个概念,一是‘代理服务器’,二是‘反向’
‘代理服务器’比较好理解,例如需要访问某网站,不想或不能直接访问,例如网络的原因、隐私的原因等,我们就连接一个代理服务器,这样对于这个网站来说,访问他的用户是这个代理服务器,而不是我们自己
‘反向’的意思我们没有通过代理服务器访问网站,但网站却在自己服务器前面加了一个代理,我们输入网址发起请求后,请求先到了这个代理服务器,代理服务器再把请求转给网站服务器
中间件总结
Dubbo
Dubbo是一个分布式服务框架,是管理中间层的工具,至于你架子上放什么是完全取决于你的,就像一个汽车骨架,你需要配你的轮子引擎。这个框架中要完成调度必须要有一个分布式的注册中心,储存所有服务的元数据,你可以用zk(Zookeeper),也可以用别的,只是大家都用zk
Dubbo的将注册中心进行抽象,是得它可以外接不同的存储媒介给注册中心提供服务,有ZooKeeper,Memcached,Redis等。
为什么要用zookeeper作为dubbo的注册中心?能选择其他的吗?
- Zookeeper的数据模型是由一系列的Znode数据节点组成,和文件系统类似。zookeeper的数据全部存储在内存中,性能高;
- zookeeper也支持集群,实现了高可用;同时基于zookeeper的特性,也支持事件监听(服务的暴露方发生变化,可以进行推送),所以zookeeper适合作为dubbo的注册中心区使用。redis、Simple也可以作为dubbo的注册中心来使用。
开发步骤
1 | 1:增加dubbo的配置文件(提供者) |
- 使用步骤
1 | 1:开启zk的服务,将dubbo的接口注册到服务中 |
Dubbo与Kafka对比
- 都可以以分布式方式处理任务和负载均衡
- Dubbo处理任务是同步的,可以收到返回结果值。Kafka是异步的,不能返回结果值。
- Kafka可以存储消息,可以从某个消息重新开始执行。如果任务执行速度较慢,消息可以缓存,不会阻塞
分布式开发应用场景
服务器中间件:Tomcat 6、7、Jboss 7、WebLogic 10、WebSphere 8
分布式服务:Dubbo+Zookeeper+Proxy+Restful
分布式消息中间件:KafKa+Flume+Zookeeper
分布式缓存:Redis 分布式文件:FastDFS
负载均衡:Keepalived+Nginx+Proxy(三重负载)
其他总结
Elasticsearch
- ElasticSearch是一个基于Lucene的搜索服务器。通过HTTP使用JSON进行数据索引,用于分布式全文检索,解决人们对于搜索的众多要求。
Nginx
- nginx本是一个web服务器和反向代理服务器,但由于丰富的负载均衡策略,常常被用于客户端可真实的服务器之间,作为负载均衡的实现。用于HTTP、HTTPS、SMTP、POP3和IMAP协议
ActiveMQ
- activeMQ是一种开源的,面向消息的中间件,用来系统之间进行通信的