0%

vue3实践笔记

环境搭建

  • node.js 安装16.0以上的版本
1
2
C:\Users\Administrator>node -v
v18.17.0
  • 你的当前工作目录正是打算创建项目的目录。在命令行中运行以下命令
1
E:\proj\StudyVue>npm init vue@latest

这一指令将会安装并执行 create-vue,它是 Vue 官方的项目脚手架工具

如果不确定是否要开启某个功能,你可以直接按下回车键选择 No。在项目被创建后,通过以下步骤安装依赖并启动开发服务器1:

  • 在项目被创建后,通过以下步骤安装依赖并启动开发服务器:
1
2
3
> cd vue-project
> npm install
> npm run dev

image-20230804152932990

vue配置

  • 安装依赖文件
1
2
3
4
5
6
7
// elementUI 3.0 版本
npm install element-plus --save
// http请求
npm install axios --save
// 路由
npm install vue-router@4 --save

  • src\router\routers.js 手动新建自定义路由
1
2
3
4
5
6
7
8
9
10
11
12
13
14
15


const routes = [
{
name: "login",
path: "/login",
component: () => import("../components/Login.vue")
},
{
name: "home",
path: "/home",
component: () => import("../components/Home.vue")
}
]
export default routes;
  • src\router\index.js 对外暴露路由
1
2
3
4
5
6
7
8
import { createRouter, createWebHistory } from "vue-router"
import routes from "./routes"
var router=createRouter({
history:createWebHistory(),
routes
})
export default router

  • src/index.js 为全局配置文件
1
2
3
4
5
6
7
8
9
10
11
12
13
import './assets/main.css'
import { createApp } from 'vue'
import App from './App.vue'
// 导入我的路由
import router from "./router/index"
// 导入ElementPlus
import ElementPlus from 'element-plus'
// 引用element的css
import 'element-plus/dist/index.css'
const app = createApp(App)
app.use(ElementPlus)
app.use(router)
app.mount('#app')
  • App.vue 代码修改如下
1
2
3
4
5
6
7
8
9
10
11
<script setup>

</script>

<template>
<router-view></router-view>
</template>

<style scoped>

</style>
  • 按需导入elementUI,在2.0版本中可以需要手动管理elementUI中各个组件,3.0中现在可以自动导入,安装如下插件:
1
2
npm install -D unplugin-vue-components unplugin-auto-import

然后把下列代码插入到你的 ViteWebpack 的配置文件中

1
2
3
4
5
6
7
8
9
10
11
12
13
14
15
16
17
18
19
20
21
22
23
24
25
26
27
28
29
30
//vite.config.js

import { fileURLToPath, URL } from 'node:url'

import { defineConfig } from 'vite'
import vue from '@vitejs/plugin-vue'
// 新增
import AutoImport from 'unplugin-auto-import/vite'
import Components from 'unplugin-vue-components/vite'
import { ElementPlusResolver } from 'unplugin-vue-components/resolvers'

// https://vitejs.dev/config/
export default defineConfig({
plugins: [
vue(),
// 新增下面两个
AutoImport({
resolvers: [ElementPlusResolver()],
}),
Components({
resolvers: [ElementPlusResolver()],
}),
],
resolve: {
alias: {
'@': fileURLToPath(new URL('./src', import.meta.url))
}
}
})

  • src\utils\ajax.js 拦截axios 设置请求url
1
2
3
4
5
6
7
8
9
10
11
12
13
14
15
16
17
18
19
20
21
22
23
24
25
26
27
28
29
30
31
32
33
34
35
36
37
import axios from 'axios'

const ajax = axios.create({
baseURL: 'http://127.0.0.1:8100/testModel',
timeout: 10000,
withCredentials: true
})

ajax.interceptors.response.use(
response => {
//拦截响应,如果发现接口返回400做统一处理跳转到登陆
if (response.data.code) {
switch (response.data.code) {
case 400:
window.location.href='/login/'

}

}
const headers = response.headers

return response
},
//接口错误状态处理,也就是说无响应时的处理
error => {
console.log("Please check your internet connection.");
console.log(error)
return Promise.reject(error) // 返回接口返回的错误信息
})


//导出我们建立的axios实例模块,ES6 export用法
export default ajax;


//导出我们建立的axios实例模块,ES6 export用法
export default ajax;
  • src\utils\html.js 所有请求都编写到这里
1
2
3
4
5
6
7
8
import ajax from "./ajax";
// export const GetPosts = () => ajax.get('posts/1')
// export const GetsearchData = (params) => ajax.get('/list',{params})
// export const PostPosts = (params) => ajax.post('posts',params)

export const LoginPost = (params) => ajax.post('/login/',params)
export const CsrfGet = () => ajax.get('/get_csrf_token/')

  • 修改package.json
1
2
3
4
5
6

"scripts": {
"dev": "vite --host 0.0.0.0", // 修改为这样,不然无法用ip访问
"build": "vite build",
"preview": "vite preview"
},

登录界面

  • 编写登录界面src\componets\Login
1
2
3
4
5
6
7
8
9
10
11
12
13
14
15
16
17
18
19
20
21
22
23
24
25
26
27
28
29
30
31
32
33
34
35
36
37
38
39
40
41
42
43
44
45
46
47
48
49
50
51
52
53
54
55
56
57
58
59
60
61
62
63
64
65
66
67
68
69
70
71
72
73
74
75
76
77
78
79
80
81
82
83
84
85
86
87
88
89
90
91
92
93
94
95
96
97
98
99
100
101
102
103
104
105
106
107
108
109
110
111
112
113
114
115
116
117
118
119
120
121
122
123
124
125
<template>
<div class="login-wrap">
<!--
:rules="rules"为表单自定义规则
:model="loginForm" 绑定js中的return 参数
-->
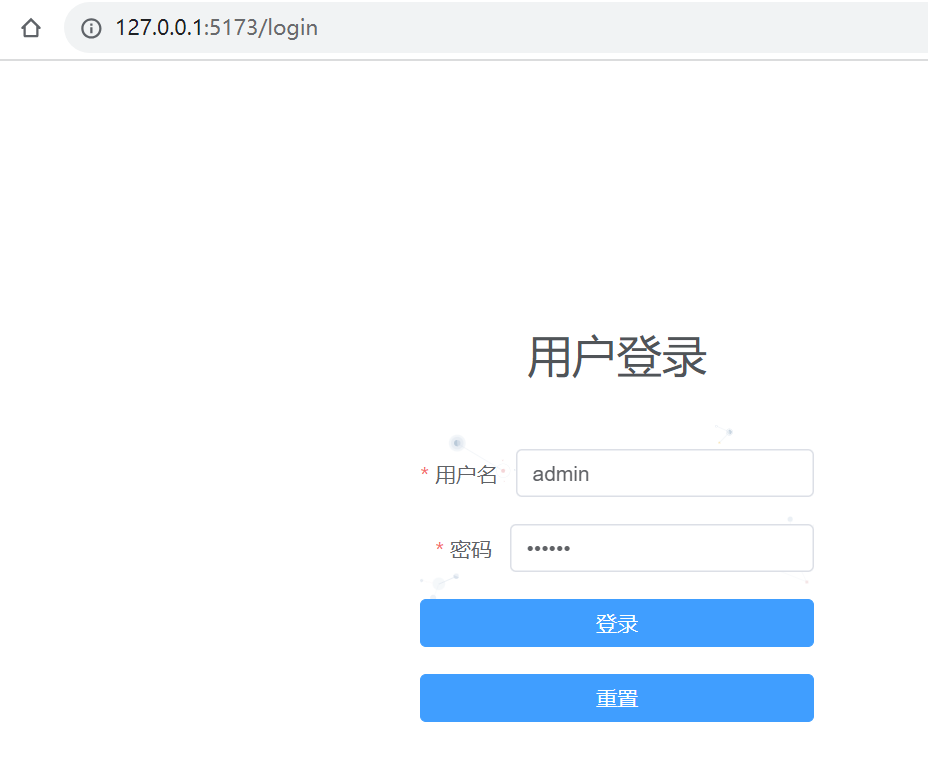
<el-form ref="loginFormRef" :rules="rules" :model="loginForm" class="login_form">
<h1 class="title">用户登录</h1>
<el-form-item label="用户名" prop="username">
<el-input type="text" placeholder="用户账号" v-model="loginForm.username" auto-complete="off"></el-input>
</el-form-item>
<el-form-item label="密码" prop="password" style="margin-left:10px;">
<el-input type="password" placeholder="密码" v-model="loginForm.password" auto-complete="off"></el-input>
</el-form-item>
<el-form-item>
<el-button type="primary" @click="submitForm(loginFormRef)" style="width: 100%;">登录</el-button>
</el-form-item>
<el-form-item>
<el-button type="primary" @click="resetForm(loginFormRef)" style="width: 100%;">重置</el-button>
</el-form-item>
</el-form>
</div>
</template>

<script lang="ts" setup>
import { reactive, ref } from 'vue'
import type { FormInstance, FormRules } from 'element-plus'
import { ElMessage } from 'element-plus'

// 引用登录请求
import { LoginPost } from "../utils/html.js"

//引入路由函数
import { useRouter } from "vue-router";
const router = useRouter()

interface LoginForm {
username: string
password: string
}
const loginFormRef = ref<FormInstance>()
// 定义表单绑定的model
const loginForm = reactive({
username: "test",
password: "",
})
// 定义规则
const rules = reactive<FormRules<LoginForm>>({
username: [
{ required: true, message: '请输入用户名', trigger: 'blur' },
// { min: 3, max: 5, message: 'Length should be 3 to 5', trigger: 'blur' },
],

password: [
{
required: true,
message: '请输入密码',
},
],
});

const submitForm = (formEl: FormInstance | undefined) => {
if (!formEl) return
formEl.validate(async (valid, fields) => {
if (valid) {
console.log('submit!')
LoginPost(JSON.stringify(loginForm)).then(res => {
console.log(res)
if (res["data"]["code"] == 1) {
// console.log("登录成功")
ElMessage({
message: '登录成功.',
type: 'success',
})
localStorage.setItem('username', loginForm.username);
router.push("/home")
} else {
ElMessage({
message: res.data.msg,
type: 'error',
})
}
})
} else {
console.log('error submit!', fields)

}
})
}
const resetForm = (formEl: FormInstance | undefined) => {
if (!formEl) return
formEl.resetFields()
}
</script>

<style scoped>
.login-wrap {
box-sizing: border-box;
width: 100%;
height: 100%;
padding-top: 10%;
background-image: url(zdmc+);
/* background-color: #112346; */
background-repeat: no-repeat;
background-position: center right;
background-size: 100%;
}

.login-container {
border-radius: 10px;
margin: 0px auto;
width: 350px;
padding: 30px 35px 15px 35px;
background: #fff;
border: 1px solid #eaeaea;
text-align: left;
box-shadow: 0 0 20px 2px rgba(0, 0, 0, 0.1);
}

.title {
margin: 0px auto 40px auto;
text-align: center;
color: #505458;
}
</style>

django后台

跨域配置

  • StudyDjango/StudyDjango/settings.py
1
2
3
4
5
6
7
8
9
10
11
12
13
14
15
16
17
18
19
20
21
22
23
24
25
26
27
28
29
30
31
32
33
34
35
36
37
38
39
40
41
42
43
44
45
46
47
48
INSTALLED_APPS = [
....
'TestModel', # 添加此项
'corsheaders', # 跨域

]

MIDDLEWARE = [
'django.middleware.security.SecurityMiddleware',
'django.contrib.sessions.middleware.SessionMiddleware',
# 'django.middleware.csrf.CsrfViewMiddleware',
# 加入这个
'corsheaders.middleware.CorsMiddleware',
]


#跨域增加忽略
CORS_ALLOW_CREDENTIALS = True
CORS_ORIGIN_ALLOW_ALL = True
CORS_ORIGIN_WHITELIST = (
'http://localhost:5173',
'http://127.0.0.1:5173',
)

CORS_ALLOW_METHODS = (
'DELETE',
'GET',
'OPTIONS',
'PATCH',
'POST',
'PUT',
'VIEW',
)

CORS_ALLOW_HEADERS = (
'XMLHttpRequest',
'X_FILENAME',
'accept-encoding',
'authorization',
'content-type',
'dnt',
'origin',
'user-agent',
'x-csrftoken',
'x-requested-with',
'Pragma',
'json'
)
  • 登录代码
1
2
3
4
5
6
7
8
9
10
11
12
13
14
15
16
17
18
def user_login(request):
if request.method != "POST":
return JsonResponse({'code': -1, 'msg': 'method must is POST'})

data = json.loads(request.body)
user_name = data.get('username')
pwd = data.get("password")
print(data)
try:
user_entry = Users.objects.get(name=user_name, pwd=pwd)
if user_entry:
# 设置登录的session
request.session["user"] = user_name
return JsonResponse({'code': 1, 'msg': 'login is success'})
else:
return JsonResponse({'code': -1, 'msg': 'login is fail221'})
except ObjectDoesNotExist:
return JsonResponse({'code': -1, 'msg': 'login is fail111'})
  • 运行代码
1
2
3
4
npm run dev

> vue-project@0.0.0 dev
> vite

image-20230808190806334

  • 输入用户名和密码登录成功后,跳转到了home页面

总结

  • 本次用的setup,和vue2.0 区别比较大,比如调用方法不在放到method中

  • 解决了vue和django 交互的跨域问题

  • 自定义路由

  • 封装axios

  • 客户端一定要用127.0.0.1 访问,需要和django中设置的白名单ip保持一致