0%

httprunner的安装和使用

说明

  • 本次搭建的为在win10下搭建httprunner

步骤

  • 通过github下载最新的版本,进行编译,我现在下载的版本为:hrp-v4.2.0-windows-amd64.tar

  • 配置环境变量PATH中的hrp的exe路径,D:\app\hrp-v4.2.0-windows-amd64

  • 检查配置环境,打开cmd输入:hrp -h

1
2
3
4
5
6
7
8
9
C:\Users\Administrator>hrp -h

License: Apache-2.0
Website: https://httprunner.com
Github: https://github.com/httprunner/httprunner
Copyright 2017 debugtalk

Usage:
hrp [command]
  • 创建项目,选择py插件
1
2
3
4
5
D:\project>hrp startproject demo --py
...
1:23AM INF python package is ready name=httprunner version=v4.2.0
11:23AM INF set python3 executable path Python3Executable="C:\\Users\\Administrator\\.hrp\\venv\\Scripts\\python.exe"
11:23AM INF create scaffold success projectName=demo

本地python版本为3.7

hrp startproject demo –go 选择go插件

代码分析

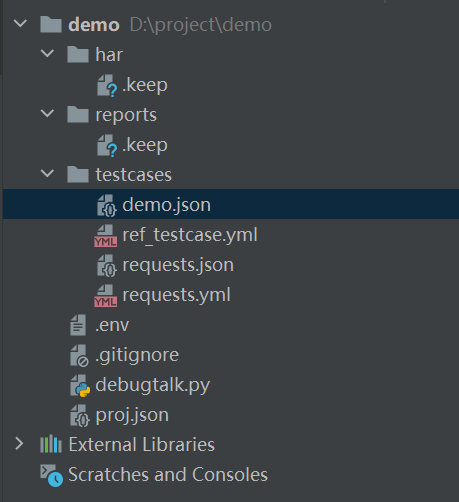
  • 查看项目代码结构如下:

image-20220905153421725

har

用 Charles 等抓包工具,以及 Chrome 等浏览器均可以导出 HAR 格式的请求文件,查看这里

reports

存放测试报告的目录

testcases

放测试用例的目录,支持json和yml,看下demo.json的代码

1
2
3
4
5
6
7
8
9
10
11
12
13
14
15
16
17
18
19
20
21
22
23
24
25
26
27
28
29
30
31
32
33
34
35
36
37
38
39
40
41
42
43
44
45
46
47
48
49
50
51
52
53
54
55
56
57
58
59
60
61
62
63
64
65
66
67
68
69
70
71
72
73
74
75
76
77
78
79
80
81
82
83
84
85
86
87
88
89
90
91
92
93
94
95
96
97
98
99
100
101
102
103
104
105
106
107
108
109
110
111
112
113
114
115
116
117
118
119
120
121
122
123
124
125
126
127
128
129
130
131
132
133
134
135
136
137
138
139
140
141
142
143
144
145
146
147
148
149
150
151
152
153
154
155
156
157
158
159
160
161
162
163
164
165
166
167
168
169
170
171
172
173
174
175
176
{
"config": {
"name": "demo with complex mechanisms",
"base_url": "https://postman-echo.com",
"variables": {
"a": "${sum(10, 2.3)}",
"b": 3.45,
"n": "${sum_ints(1, 2, 2)}",
"varFoo1": "${gen_random_string($n)}",
"varFoo2": "${max($a, $b)}"
}
},
"teststeps": [
{
"name": "transaction 1 start",
"transaction": {
"name": "tran1",
"type": "start"
}
},
{
"name": "get with params",
"request": {
"method": "GET",
"url": "/get",
"params": {
"foo1": "$varFoo1",
"foo2": "$varFoo2"
},
"headers": {
"User-Agent": "HttpRunnerPlus"
}
},
"variables": {
"b": 34.5,
"n": 3,
"name": "get with params",
"varFoo2": "${max($a, $b)}"
},
"setup_hooks": [
"${setup_hook_example($name)}"
],
"teardown_hooks": [
"${teardown_hook_example($name)}"
],
"extract": {
"varFoo1": "body.args.foo1"
},
"validate": [
{
"check": "status_code",
"assert": "equals",
"expect": 200,
"msg": "check response status code"
},
{
"check": "headers.\"Content-Type\"",
"assert": "startswith",
"expect": "application/json"
},
{
"check": "body.args.foo1",
"assert": "length_equals",
"expect": 5,
"msg": "check args foo1"
},
{
"check": "$varFoo1",
"assert": "length_equals",
"expect": 5,
"msg": "check args foo1"
},
{
"check": "body.args.foo2",
"assert": "equals",
"expect": "34.5",
"msg": "check args foo2"
}
]
},
{
"name": "transaction 1 end",
"transaction": {
"name": "tran1",
"type": "end"
}
},
{
"name": "post json data",
"request": {
"method": "POST",
"url": "/post",
"body": {
"foo1": "$varFoo1",
"foo2": "${max($a, $b)}"
}
},
"validate": [
{
"check": "status_code",
"assert": "equals",
"expect": 200,
"msg": "check status code"
},
{
"check": "body.json.foo1",
"assert": "length_equals",
"expect": 5,
"msg": "check args foo1"
},
{
"check": "body.json.foo2",
"assert": "equals",
"expect": 12.3,
"msg": "check args foo2"
}
]
},
{
"name": "post form data",
"request": {
"method": "POST",
"url": "/post",
"headers": {
"Content-Type": "application/x-www-form-urlencoded; charset=UTF-8"
},
"body": {
"foo1": "$varFoo1",
"foo2": "${max($a, $b)}",
"time": "${get_timestamp()}"
}
},
"extract": {
"varTime": "body.form.time"
},
"validate": [
{
"check": "status_code",
"assert": "equals",
"expect": 200,
"msg": "check status code"
},
{
"check": "body.form.foo1",
"assert": "length_equals",
"expect": 5,
"msg": "check args foo1"
},
{
"check": "body.form.foo2",
"assert": "equals",
"expect": "12.3",
"msg": "check args foo2"
}
]
},
{
"name": "get with timestamp",
"request": {
"method": "GET",
"url": "/get",
"params": {
"time": "$varTime"
}
},
"validate": [
{
"check": "body.args.time",
"assert": "length_equals",
"expect": 13,
"msg": "check extracted var timestamp"
}
]
}
]
}
  • 在json里面引用的函数如{sum(10, 2.3)},需要在debugtalk.py自定义,但是max应该为内置函数,不用自定义编写
  • 事务代码说明
1
2
3
4
type Transaction struct {
Name string `json:"name" yaml:"name"` // 事务名称,可定义为任意字符串
Type transactionType `json:"type" yaml:"type"` // 事务类型,仅包括 2 种类型,start(事务开始)和 end(结束事务)
}
  • 在测试用例中,transaction 应该成对出现,即必须同时定义 start 和 end;如果存在配对缺失的情况,会按照如下逻辑进行处理:
    • 仅设置开始事务,则会在测试用例最后一个测试步后添加结束事务
    • 仅设置结束事务,则会在测试用例第一个测试步前添加开始事务
  • 更多的手工编写用例介绍

其他文件

  • .env 配置环境变量信息,如登录的信息
  • debugtalk.py 自定义函数
  • proj.json 项目的信息

运行用例

1
2
3
4
5
6
7
8
9
10
11
12
13
14
15
16
17
18
19
20
21
D:\project\demo>hrp run testcases\demo.json --gen-html-report

...
==================== response ====================
Connected via TLSv1.2
HTTP/1.1 200 OK
Content-Length: 406
Connection: keep-alive
Content-Type: application/json; charset=utf-8
Date: Mon, 05 Sep 2022 08:08:52 GMT
Etag: W/"196-F4bYgnayuG8mswnHB8kP+Hk/6J4"
Set-Cookie: sails.sid=s%3AF7CgL7_NwzZjvKsH7GKmjPHovUPl7kza.7RUa8O71oEJjVUKcWKAkLw0m0ztEnlmlVzJimZz5H2E; Path=/; HttpOnly
Vary: Accept-Encoding

{"args":{"time":"1662365339120"},"headers":{"x-forwarded-proto":"https","x-forwarded-port":"443","host":"postman-echo.com","x-amzn-trace-id":"Root=1-6315ae94-58d38b1f1c45c8b94273a5a3","user-agent":"Go-http-client/1.1","cookie":"sails.sid=s%3A9zczVs9TODPR3d-xi5F59muThb8LgjjY.bDP%2FcJnt8Ou9QPjs7Y9v15utVqCU%2FrK3EddVu6ThODc","accept-encoding":"gzip"},"url":"https://postman-echo.com/get?time=1662365339120"}
--------------------------------------------------
4:08PM INF validate body.args.time assertMethod=length_equals checkExpr=body.args.time checkValue=1662365339120 checkValueType=string expectValue=13 expectValueType=int64 result=true
4:08PM INF run step end exportVars=null step="get with timestamp" success=true type=request
4:08PM INF run testcase end testcase="demo with complex mechanisms"
4:08PM INF quit hashicorp plugin process
2022-09-05T16:09:01.733+0800 [WARN] grpc-py: plugin failed to exit gracefully

pytest也支持,测试 case 的文件应该以 _test 结尾

1
>hrp pytest testcases/py_test.py --html=/report/index.html  --junit-xml=/report/report.xml
  • 执行完成后,在reports目录发现了测试报告的html文件

image-20220905161310265

关于登录

很多用例都是需要登录后才能处理,如果比较简单可以类似这样处理,下面取token

1
2
3
4
5
6
7
8
9
10
11
12
13
14
15
16
17
18
19
20
21
22
23
24
25
26
27
28
- config:
name: logincase
variables: {}


teststeps:
-
name: login case1
request:
url: http://127.0.0.1:8000/api/v1/login/
method: POST
headers:
Content-Type: application/json
User-Agent: python-requests/2.18.4
json:
username: test
password: 123456
extract:
- token: content.token # 提取token
-
name: get user info case1
request:
url: http://127.0.0.1:8000/api/v1/user/info/
method: GET
headers:
Content-Type: application/json
User-Agent: python-requests/2.18.4
Authorization: Token $token # 引用token
  • cookie
1
2
3
4
5
6
7
8
9
10
11
12
13
14
15
16
17
18
19
20
21
22
23
24
25
26
27
28
- config:
name: logincase
variables: {}


teststeps:
-
name: login case1
request:
url: http://127.0.0.1:8000/api/v1/login/
method: POST
headers:
Content-Type: application/json
User-Agent: python-requests/2.18.4
json:
username: test
password: 123456
extract:
- cookievalue: headers.Set-Cookie # 提取Cookie
-
name: get user info case1
request:
url: http://127.0.0.1:8000/api/v1/user/info/
method: GET
headers:
Content-Type: application/json
User-Agent: python-requests/2.18.4
cookie: $cookievalue # 把提取到的 cookies 附加到本次请求头域
  • 如果是比较复杂的登录校验,可以采用setup_hooks调用自定义函数(debugtalk.py中编写)完成登录校验

性能压测

  • 关于性能测试,可以参考这里,需要用go
  • 本地的项目需要采用hrp startproject demo --go来新建go插件的项目