说明
ssm整合
1
2
3
4
5
6
7
8
9
10
11
12
13
14
15
16
17
18
19
20
21
22
23
24
25
26
27
28
29
30
31
32
33
34
35
36
37
38
39
40
41
42
43
44
45
46
47
48
49
50
51
52
53
54
55
56
57
58
59
60
61
62
63
64
65
<dependencies> <dependency> <groupId>org.springframework</groupId> <artifactId>spring-context</artifactId> <version>5.2.16.RELEASE</version> </dependency> <dependency> <groupId>org.springframework</groupId> <artifactId>spring-jdbc</artifactId> <version>5.2.16.RELEASE</version> </dependency> <dependency> <groupId>mysql</groupId> <artifactId>mysql-connector-java</artifactId> <version>8.0.25</version> </dependency> <!--mybatis环境--> <dependency> <groupId>org.mybatis</groupId> <artifactId>mybatis</artifactId> <version>3.5.3</version> </dependency> <!--spring整合mybatis--> <dependency> <groupId>org.mybatis</groupId> <artifactId>mybatis-spring</artifactId> <version>2.0.3</version> </dependency> <!--连接池--> <dependency> <groupId>com.zaxxer</groupId> <artifactId>HikariCP</artifactId> <version>3.4.2</version> </dependency> <dependency> <groupId>org.projectlombok</groupId> <artifactId>lombok</artifactId> <version>1.18.20</version> </dependency> <!--分页插件坐标--> <dependency> <groupId>com.github.pagehelper</groupId> <artifactId>pagehelper</artifactId> <version>5.1.2</version> </dependency> <dependency> <groupId>javax.annotation</groupId> <artifactId>javax.annotation-api</artifactId> <version>1.3.2</version> </dependency> <dependency> <groupId>com.fasterxml.jackson.core</groupId> <artifactId>jackson-databind</artifactId> <version>2.9.0</version> </dependency> <!--servlet环境--> <dependency> <groupId>javax.servlet</groupId> <artifactId>javax.servlet-api</artifactId> <version>3.1.0</version> <scope>provided</scope> </dependency> </dependencies>
集成spring
在resources下新建applicationContext.xml,做为spring的配置文件
1
2
3
4
5
6
7
8
9
10
11
12
13
<?xml version="1.0" encoding="UTF-8"?> <beans xmlns="http://www.springframework.org/schema/beans" xmlns:context="http://www.springframework.org/schema/context" xmlns:tx="http://www.springframework.org/schema/tx" xmlns:xsi="http://www.w3.org/2001/XMLSchema-instance" xsi:schemaLocation="http://www.springframework.org/schema/beans http://www.springframework.org/schema/beans/spring-beans.xsd http://www.springframework.org/schema/tx http://www.springframework.org/schema/tx/spring-tx.xsd http://www.springframework.org/schema/context http://www.springframework.org/schema/context/spring-context.xsd"> <!--开启bean注解扫描--> <context:component-scan base-package="xyz.shi"/> </beans>
1
2
3
4
5
6
7
8
9
10
11
package xyz.shi.service; import org.springframework.stereotype.Service; @Service public class UserService { public void test(){ System.out.println("test...."); } }
新建APP.java,测试UserService可用
1
2
3
4
5
6
7
8
9
10
11
12
import org.springframework.context.ApplicationContext; import org.springframework.context.support.ClassPathXmlApplicationContext; import xyz.shi.service.UserService; public class App { public static void main(String[] args) { ApplicationContext context = new ClassPathXmlApplicationContext("applicationContext.xml"); UserService userService = context.getBean(UserService.class); userService.test(); } }
Spring集成Mybatis
1
2
3
4
5
6
7
8
9
10
package xyz.shi.pojo; import lombok.Data; @Data public class User { private int id; private String name; private String password; }
在resources新建jdbc.properties,在spring-dao.xml中引入,将数据库配置提取出来
1
2
3
4
5
6
7
jdbc.url=jdbc:mysql://localhost:3306/test?characterEncoding=utf8&serverTimezone=UTC jdbc.username=root jdbc.password=123456 jdbc.driverClassName=com.mysql.cj.jdbc.Driver jdbc.autoCommit=true jdbc.connectionTimeout=5000 jdbc.idleTimeout=60
在resources下新建spring-dao的xml配置文件
1
2
3
4
5
6
7
8
9
10
11
12
13
14
15
16
17
18
19
20
21
22
23
24
25
26
27
28
29
30
31
32
33
34
35
36
37
38
39
40
41
42
43
<?xml version="1.0" encoding="UTF-8"?> <beans xmlns="http://www.springframework.org/schema/beans" xmlns:context="http://www.springframework.org/schema/context" xmlns:xsi="http://www.w3.org/2001/XMLSchema-instance" xsi:schemaLocation="http://www.springframework.org/schema/beans http://www.springframework.org/schema/beans/spring-beans.xsd http://www.springframework.org/schema/context http://www.springframework.org/schema/context/spring-context.xsd"> <context:property-placeholder location="classpath*:*.properties"/> <bean id="hikariConfig" class="com.zaxxer.hikari.HikariConfig"> <property name="jdbcUrl" value="${jdbc.url}"/> <property name="username" value="${jdbc.username}"/> <property name="password" value="${jdbc.password}"/> <property name="driverClassName" value="${jdbc.driverClassName}"/> <property name="autoCommit" value="${jdbc.autoCommit}"/> <property name="connectionTimeout" value="${jdbc.connectionTimeout}" /> <property name="idleTimeout" value="${jdbc.idleTimeout}" /> </bean> <!--jdbc的xml配置--> <bean id="dataSource" class="com.zaxxer.hikari.HikariDataSource"> <constructor-arg name="configuration" ref="hikariConfig"/> </bean> <!--mybatis--> <bean class="org.mybatis.spring.SqlSessionFactoryBean"> <property name="dataSource" ref="dataSource" /> <property name="mapperLocations" value="classpath*:mapper/*.xml"/> <property name="plugins"> <array> <bean class="com.github.pagehelper.PageInterceptor"> <property name="properties"> <props> <prop key="helperDialect">mysql</prop> </props> </property> </bean> </array> </property> </bean> <!--配置mapper接口的扫包路径,目的是代理此接口,生成代理类 注册到spring容器中--> <bean class="org.mybatis.spring.mapper.MapperScannerConfigurer"> <property name="basePackage" value="xyz.shi.mapper"/> </bean> </beans>
1
2
3
4
5
6
7
package xyz.shi.mapper; import xyz.shi.pojo.User; public interface UserMapper { User findUser(Integer id); }
在resources下新建mapper/UserMapper.xml
1
2
3
4
5
6
7
8
9
10
<?xml version="1.0" encoding="UTF-8"?> <!DOCTYPE mapper PUBLIC "-//mybatis.org//DTD Mapper 3.0//EN" "http://mybatis.org/dtd/mybatis-3-mapper.dtd"> <mapper namespace="xyz.shi.mapper.UserMapper"> <select id="findUser" parameterType="int" resultType="xyz.shi.pojo.User"> select * from users where id=#{id} </select> </mapper>
在UserService中注入UserMapper,实现查询用户的业务
1
2
3
4
5
6
7
8
9
10
11
12
13
14
15
16
17
18
19
20
package xyz.shi.service; import org.springframework.stereotype.Service; import xyz.shi.mapper.UserMapper; import xyz.shi.pojo.User; import javax.annotation.Resource; @Service public class UserService { @Resource private UserMapper userMapper; public void test(){ System.out.println("test...."); } public User getUser(int id){ return userMapper.findUser(id); } }
集成SpringMVC 将pom.xml中的package改为war,加入springMVC,就是web工程,同时导入spring-webmvc的依赖
1
2
3
4
5
6
7
8
9
10
11
12
13
14
15
16
17
18
19
20
21
22
23
24
25
26
27
28
29
30
31
32
33
<?xml version="1.0" encoding="UTF-8"?> <project xmlns="http://maven.apache.org/POM/4.0.0" xmlns:xsi="http://www.w3.org/2001/XMLSchema-instance" xsi:schemaLocation="http://maven.apache.org/POM/4.0.0 http://maven.apache.org/xsd/maven-4.0.0.xsd"> <modelVersion>4.0.0</modelVersion> <groupId>org.example</groupId> <artifactId>ssm</artifactId> <version>1.0-SNAPSHOT</version> <packaging>war</packaging> <properties> <maven.compiler.source>8</maven.compiler.source> <maven.compiler.target>8</maven.compiler.target> <project.build.sourceEncoding>UTF-8</project.build.sourceEncoding> </properties> <dependencies> <!-- <dependency>--> <!-- <groupId>org.springframework</groupId>--> <!-- <artifactId>spring-context</artifactId>--> <!-- <version>5.2.16.RELEASE</version>--> <!-- </dependency>--> <dependency> <groupId>org.springframework</groupId> <artifactId>spring-webmvc</artifactId> <version>5.2.16.RELEASE</version> </dependency> <dependency> <groupId>org.springframework</groupId> <artifactId>spring-jdbc</artifactId> <version>5.2.16.RELEASE</version> </dependency>
1
2
3
4
5
6
7
8
9
10
11
12
13
14
15
16
17
18
19
20
21
22
23
24
25
26
27
28
29
30
31
32
33
34
35
36
37
38
39
40
41
42
<?xml version="1.0" encoding="UTF-8"?> <web-app xmlns="http://xmlns.jcp.org/xml/ns/javaee" xmlns:xsi="http://www.w3.org/2001/XMLSchema-instance" xsi:schemaLocation="http://xmlns.jcp.org/xml/ns/javaee http://xmlns.jcp.org/xml/ns/javaee/web-app_3_1.xsd" version="3.1"> <!--spring配置文件加载--> <context-param> <param-name>contextConfigLocation</param-name> <param-value>classpath*:applicationContext.xml</param-value> </context-param> <listener> <listener-class>org.springframework.web.context.ContextLoaderListener</listener-class> </listener> <!--解决post请求乱码--> <filter> <filter-name>CharacterEncodingFilter</filter-name> <filter-class>org.springframework.web.filter.CharacterEncodingFilter</filter-class> <init-param> <param-name>encoding</param-name> <param-value>UTF-8</param-value> </init-param> </filter> <filter-mapping> <filter-name>CharacterEncodingFilter</filter-name> <url-pattern>/*</url-pattern> </filter-mapping> <!--springmvc配置文件加载--> <servlet> <servlet-name>DispatcherServlet</servlet-name> <servlet-class>org.springframework.web.servlet.DispatcherServlet</servlet-class> <init-param> <param-name>contextConfigLocation</param-name> <param-value>classpath*:spring-mvc.xml</param-value> </init-param> </servlet> <servlet-mapping> <servlet-name>DispatcherServlet</servlet-name> <!--/代表拦截所有请求,一般也写做*.do代表只匹配.do后缀的请求--> <url-pattern>/</url-pattern> </servlet-mapping> </web-app>
在resources下新建spring-mvc.xml,其中加入mvc相关的配置
1
2
3
4
5
6
7
8
9
10
11
12
13
14
15
16
17
18
19
20
<?xml version="1.0" encoding="UTF-8"?> <beans xmlns="http://www.springframework.org/schema/beans" xmlns:context="http://www.springframework.org/schema/context" xmlns:mvc="http://www.springframework.org/schema/mvc" xmlns:tx="http://www.springframework.org/schema/tx" xmlns:xsi="http://www.w3.org/2001/XMLSchema-instance" xsi:schemaLocation="http://www.springframework.org/schema/beans http://www.springframework.org/schema/beans/spring-beans.xsd http://www.springframework.org/schema/mvc http://www.springframework.org/schema/mvc/spring-mvc.xsd http://www.springframework.org/schema/tx http://www.springframework.org/schema/tx/spring-tx.xsd http://www.springframework.org/schema/context http://www.springframework.org/schema/context/spring-context.xsd"> <!--这个不能忘,分开加载spring配置文件,扫包也需要单独配置--> <context:component-scan base-package="xyz.shi.controller" /> <!--开启mvc的注解支持--> <mvc:annotation-driven/> <!--扫包的配置,在spring配置文件中 已经定义,保证controller在扫包范围内即可--> <!--过滤静态文件--> <mvc:default-servlet-handler /> </beans>
新建UserController.java,调用Service,完成根据id获取用户信息的逻辑
1
2
3
4
5
6
7
8
9
10
11
12
13
14
15
16
17
18
19
20
21
22
package xyz.shi.controller; import org.springframework.beans.factory.annotation.Autowired; import org.springframework.web.bind.annotation.GetMapping; import org.springframework.web.bind.annotation.PathVariable; import org.springframework.web.bind.annotation.RequestMapping; import org.springframework.web.bind.annotation.RestController; import xyz.shi.pojo.User; import xyz.shi.service.UserService; @RestController @RequestMapping("user") public class UserController { @Autowired private UserService userService; @GetMapping("getUser/{id}") public User findUser(@PathVariable int id){ return userService.getUser(id); } }
本地安装tomcat,我的版本为9.0.83,然后idea中装插件Smart tomcat,然后webapp右键运行
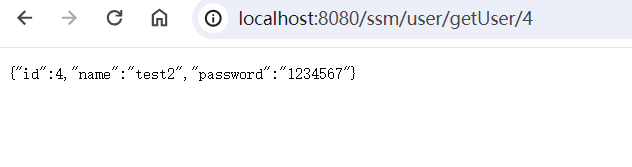
http://localhost:8080/ssm/user/getUser/4 打开
添加事务配置 resource-spring-tx.xml
1
2
3
4
5
6
7
8
9
10
11
12
13
14
<?xml version="1.0" encoding="UTF-8"?> <beans xmlns="http://www.springframework.org/schema/beans" xmlns:context="http://www.springframework.org/schema/context" xmlns:tx="http://www.springframework.org/schema/tx" xmlns:xsi="http://www.w3.org/2001/XMLSchema-instance" xsi:schemaLocation="http://www.springframework.org/schema/beans http://www.springframework.org/schema/beans/spring-beans.xsd http://www.springframework.org/schema/tx http://www.springframework.org/schema/tx/spring-tx.xsd http://www.springframework.org/schema/context http://www.springframework.org/schema/context/spring-context.xsd"> <tx:annotation-driven proxy-target-class="true"/> <bean id="transactionManager" class="org.springframework.jdbc.datasource.DataSourceTransactionManager"> <property name="dataSource" ref="dataSource" /> </bean> </beans>
applicationContext.xml中导入
1 <import resource="spring-tx.xml" />
1
2
3
4
5
6
7
<insert id="save" parameterType="xyz.shi.pojo.User" keyProperty="id" useGeneratedKeys="true"> insert into users(name,password) value(#{name},#{password}) </insert> <select id="findAll" resultType="xyz.shi.pojo.User"> select * from users </select>
1
2
3
4
5
public interface UserMapper { User findUser(int id); void saveTx(User user); Page<User> findAll(); }
1
2
3
4
5
6
7
8
9
10
11
12
13
14
15
16
17
18
19
20
21
22
23
24
25
26
27
28
29
30
31
package xyz.shi.service; import org.springframework.stereotype.Service; import xyz.shi.mapper.UserMapper; import xyz.shi.pojo.User; import org.springframework.transaction.annotation.Transactional; import javax.annotation.Resource; @Service public class UserService { @Resource private UserMapper userMapper; public void test(){ System.out.println("test...."); } public User getUser(int id){ return userMapper.findUser(id); } public Page<User> findAll(Integer PageNum, Integer PageSize) { //在查询之前,设置分页条件 显示第一页,展示3条数据 Page<Object> page = PageHelper.startPage(PageNum, PageSize); return userMapper.findAll(); } @Transactional public void saveTx(User user) { userMapper.save(user); int i = 10 / 0; //模拟发生异常 // 加上事务标识后,只有出现异常才不会造成新增数据成功 }
加上事务标识后,只有出现异常才会触发事务
1
2
3
4
5
6
7
@GetMapping("saveTx") public void saveTx(String name, String password) { User user = new User(); user.setName(name); user.setPassword(password); userService.saveTx(user); }
打开http://localhost:8080/ssm/user/saveTx?name=123&&password=456 报错了,数据新增不会成功,如果不加Transactional标识,即使报错了新增数据也会成功
分页查询
其他 拦截器
统一异常处理 为什么要有统一异常呢?
如果是编码过程中没有预料到的异常,比如bug,内存不足,硬件错误等等造成的,会提示给用户一些不友好的信息,如果在controller中处理,那么每个controller都要try catch,又过于繁琐
异常的种类很多,有自定义的业务异常,有系统异常,有空指针异常,有数组越界等,每种异常处理的方式都不一致,比如业务异常,需要提示用户准确信息,系统异常需要提示用户友好信息(系统繁忙,请稍候再试)并且记录错误,空指针异常遇到发送错误日志短信给开发人员等
使用
1
2
3
4
5
6
7
8
9
10
11
12
13
14
15
16
17
18
19
20
21
22
23
24
25
26
27
28
29
30
31
32
33
34
35
36
37
38
39
40
41
42
43
44
45
46
47
48
49
50
51
52
53
54
55
56
57
58
59
60
61
62
63
64
65
66
67
68
69
70
71
package xyz.shi.handler; import lombok.Data; //统一结果返回 @Data public class Result { private boolean success; private int code; private String message; private Object data; } package xyz.shi.handler; public class BusinessException extends RuntimeException { private int code; public BusinessException(){ super(); } public BusinessException(Integer code,String message){ super(message); this.code = code; } public int getCode() { return code; } public void setCode(int code) { this.code = code; } } package xyz.shi.handler; import org.springframework.web.bind.annotation.ControllerAdvice; import org.springframework.web.bind.annotation.ExceptionHandler; import org.springframework.web.bind.annotation.ResponseBody; @ControllerAdvice public class MyExceptionHandler { @ExceptionHandler(Exception.class) @ResponseBody public Result doException(Exception e) { //记录异常 e.printStackTrace(); Result result = new Result(); result.setCode(-999); result.setMessage("未知的异常,提示友好信息"); result.setSuccess(false); return result; } @ExceptionHandler(IndexOutOfBoundsException.class) @ResponseBody public Result doStack(IndexOutOfBoundsException e) { //记录异常 e.printStackTrace(); //发送短信给开发人员 // send() Result result = new Result(); result.setCode(-999); result.setMessage("数组越界异常"); result.setSuccess(false); return result; } @ExceptionHandler(BusinessException.class) @ResponseBody public Result doBusiness(BusinessException e) { Result result = new Result(); result.setCode(e.getCode()); result.setMessage(e.getMessage()); result.setSuccess(false); return result; } }
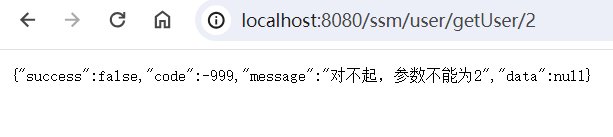
1
2
3
4
5
6
7
8
9
10
11
12
13
14
15
@GetMapping("getUser/{id}") public Result findUser(@PathVariable int id){ System.out.println("getUser方法调用..."); if (id == 2){ throw new BusinessException(-999,"对不起,参数不能为2"); } if (id == 3){ throw new IndexOutOfBoundsException(); } if (id == 4){ int i = 10/0; } User user = userService.getUser(id); return new Result(true,200,"success",user); }
获取值正常时,比如:http://localhost:8080/ssm/user/getUser/10,得到结果{"success":true,"code":200,"message":"success","data":{"id":10,"name":"456","password":"123456"}}
数据校验
在进行请求的时候,大多数往往会携带参数,我们总需要对参数进行合法性的校验,比如不能为null,密码长度不能小于8,用户名必须使用大小写字母+数字等等
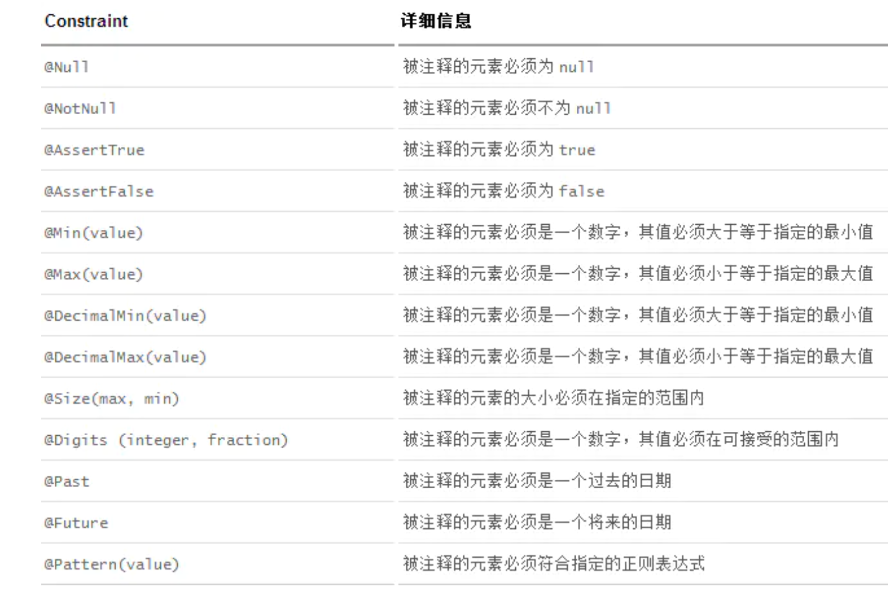
JSR 303 是 Java 为 Bean 数据合法性校验提供的标准框架,通过在 Bean 属性上标注 类似于 @NotNull、@Max 等标准的注解指定校验规则,并通过标准的验证接口对 Bean 进行验证。
1
2
3
4
5
<dependency> <groupId>org.hibernate</groupId> <artifactId>hibernate-validator</artifactId> <version>6.1.0.Final</version> </dependency>
1
2
3
4
5
6
7
8
9
10
11
12
13
14
package xyz.shi.pojo; import lombok.Data; import org.hibernate.validator.constraints.Length; import javax.validation.constraints.NotNull; @Data public class User { private int id; @NotNull(message = "用户名不能为空") private String name; @Length(min = 5, max = 100, message = "密码长度只能在5-100之间") private String password; }
1
2
3
4
5
6
7
8
9
10
11
12
13
14
15
16
17
@PostMapping("save") public Result save( @Valid User user, BindingResult bindingResult) { System.out.println(user); if (bindingResult.hasErrors()) { //获取校验有错误的字段 List<FieldError> fieldErrors = bindingResult.getFieldErrors(); for (FieldError fieldError : fieldErrors) { System.out.println(fieldError.getField()); System.out.println(fieldError.getDefaultMessage()); System.out.println("------------------------------"); return new Result(true,-1,fieldError.getDefaultMessage(),null); } } userService.save(user); return new Result(true,200,"success",user); }
1
2
3
4
5
6
data = {"name": "123", "password": "1111"} t = requests.post("http://localhost:8080/ssm/user/save", data=data) s = t.text print(s) == {"success":true,"code":-1,"message":"密码长度只能在5-100之间","data":null}
日志
主流使用的日志是logback和log4j2,本次主要演示logback
依赖文件
1
2
3
4
5
6
7
8
9
10
11
12
13
14
15
16
<!--日志 --> <dependency> <groupId>ch.qos.logback</groupId> <artifactId>logback-classic</artifactId> <version>1.1.3</version> </dependency> <dependency> <groupId>org.logback-extensions</groupId> <artifactId>logback-ext-spring</artifactId> <version>0.1.2</version> </dependency> <dependency> <groupId>org.slf4j</groupId> <artifactId>jcl-over-slf4j</artifactId> <version>1.7.12</version> </dependency>
第一个logback-classic包含了logback本身所需的slf4j-api.jar、logback-core.jar及logback-classsic.jar。
第二个logback-ext-spring是由官方提供的对Spring的支持
第三个jcl-over-slf4j是用来把Spring源代码中大量使用到的commons-logging替换成slf4j,只有在添加了这个依赖之后才能看到Spring框架本身打印的日志–即info文件中打印出的spring启动日志信息,否则只能看到开发者自己打印的日志
1
2
3
4
5
6
7
8
9
10
<?xml version="1.0" encoding="UTF-8"?> <!--scan当此属性设置为true时,配置文件如果发生改变,将会被重新加载,默认值为true。scanPeriod 设置监测配置文件是否有修改的时间间隔,如果没有给出时间单位,默认单位是毫秒。当scan为true时,此属性生效。默认的时间间隔为1分钟。debug 当此属性设置为true时,将打印出logback内部日志信息,实时查看logback运行状态。默认值为false。--> <configuration scan="true" scanPeriod="60 seconds" debug="true"> <!-- 模块名称, 影响日志配置名,日志文件名 --> <property name="appName" value="mszluSpring"/> <property name="logMaxSize" valule="100MB"/> <!--rootPath 日志路径 --> <property name="rootPath" value="D:/log"/> <contextName>${appName}</contextName> ...
日志级别标准:ALL < TRACE < DEBUG < INFO < WARN < ERROR < FATAL < OFF
直接运行后,就能在d/log目录下看到相应的日志文件
但是发现一个问题,如果系统报错了error日志没有记录,是因为我们使用了@ControllerAdvice这个异常类,需要在自定义异常类中加入如下代码:log.error
1
2
3
4
5
6
7
8
9
10
11
12
13
14
15
16
17
18
19
20
21
22
23
24
25
26
27
28
29
30
31
32
33
34
35
36
37
38
39
40
41
42
43
44
45
46
47
48
49
50
51
package xyz.shi.handler; import org.slf4j.Logger; import org.slf4j.LoggerFactory; import org.springframework.web.bind.annotation.ControllerAdvice; import org.springframework.web.bind.annotation.ExceptionHandler; import org.springframework.web.bind.annotation.ResponseBody; @ControllerAdvice public class MyExceptionHandler { private static final Logger log = LoggerFactory.getLogger(MyExceptionHandler.class); @ExceptionHandler(Exception.class) @ResponseBody public Result doException(Exception e) { //记录异常 e.printStackTrace(); log.error("500 Internal Server Error", e); Result result = new Result(); result.setCode(-999); result.setMessage("未知的异常,提示友好信息"); result.setSuccess(false); return result; } @ExceptionHandler(IndexOutOfBoundsException.class) @ResponseBody public Result doStack(IndexOutOfBoundsException e) { //记录异常 e.printStackTrace(); log.error("500 Internal Server Error", e); //发送短信给开发人员 // send() Result result = new Result(); result.setCode(-999); result.setMessage("数组越界异常"); result.setSuccess(false); return result; } @ExceptionHandler(BusinessException.class) @ResponseBody public Result doBusiness(BusinessException e) { log.error("500 Internal Server Error", e); Result result = new Result(); result.setCode(e.getCode()); result.setMessage(e.getMessage()); result.setSuccess(false); return result; } }
纯注解ssm整合