常用组件汇总
1
2
3
4
5
6
7
8
9
10
11
12
13
14
15
16
17
18
| from tkinter import *
from tkinter import messagebox
root = Tk()
root.title('我的gui程序')
root.geometry('500x300+100+200')
bt = Button(root)
bt['text'] = '点我'
bt.pack()
def click(e):
print(e)
messagebox.showinfo('message', 'give flower')
bt.bind('<Button-1>', click)
root.mainloop()
|
- 查看
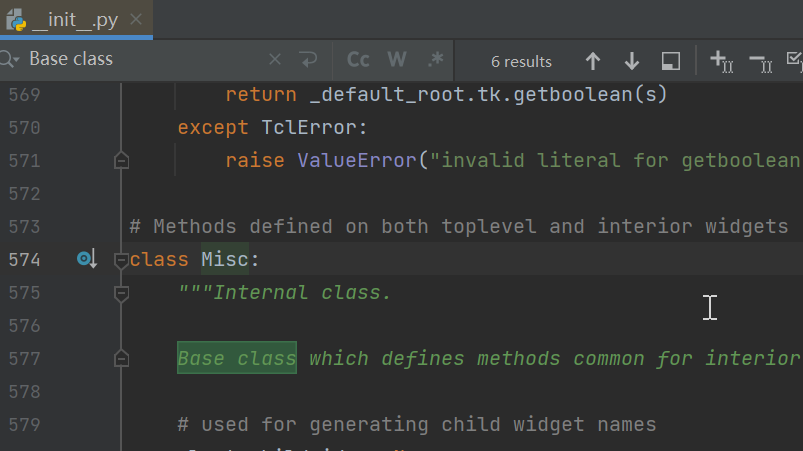
root = Tk(),查看源码,发现其实就是实例化class Tk(Misc, Wm),发现注释中写明了是Base class,经过搜索发现了6个基类,这6个基类包含了常见的组件


面向对象写法
1
2
3
4
5
6
7
8
9
10
11
12
13
14
15
16
17
18
19
20
21
22
23
24
25
26
27
28
29
30
31
32
33
34
35
| from tkinter import *
from tkinter import messagebox
class Application(Frame):
"""
继承Frame容器类
"""
def __init__(self, master=None):
super().__init__(master)
self.master = master
self.pack()
self.createWidget()
def createWidget(self):
# 创建组件
self.btn01 = Button(self)
self.btn01['text'] = '点击送花'
self.btn01.pack()
self.btn01['command'] = self.songhua
# 创建一个退出按钮
self.btnQuit = Button(self, text='退出', command=root.destroy)
self.btnQuit.pack()
def songhua(self):
messagebox.showinfo('送花', '送你99朵玫瑰花')
root = Tk()
root.geometry('400x100+200+300')
root.title('一个经典的GUI程序类的测试')
app = Application(master=root)
root.mainloop()
|
常见组件用法
label
主要用于显示文本信息,也可以显示图像,常见属性如下
width,height
用于指定区域大小,如果显示是文本,则以单个英文字符大小为单位(一个汉字宽度占 2 个字符位置,高度和英文字符一样);如果显示是图像,则以像素为单位。默认值是根据具体显示的内容动态调整。
font
指定字体和字体大小,如:font =(font_name,size)
image
显示在 Label 上的图像,目前 tkinter 只支持 gif 格式。
fg 和 bg
fg(foreground):前景色、bg(background):背景色
justify
针对多行文字的对齐,可设置 justify 属性,可选值”left” “center” “right”
1
2
3
4
5
6
7
8
9
10
11
12
13
14
15
16
17
18
19
20
21
22
23
24
25
26
27
28
29
30
31
32
33
| from tkinter import *
class Application(Frame):
def __init__(self, master=None):
super().__init__(master)
self.master = master
self.pack()
self.createWidget()
def createWidget(self):
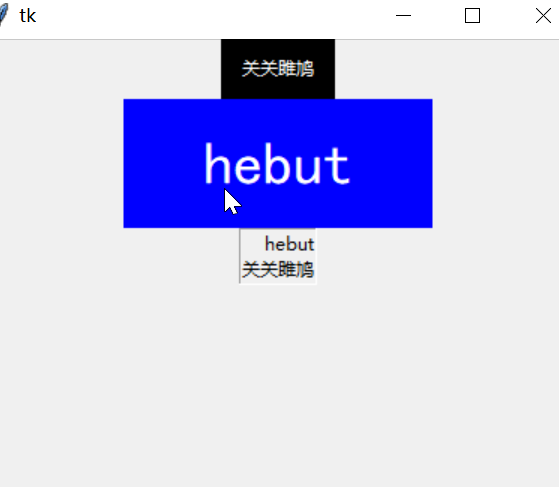
self.label01 = Label(self, text='关关雎鸠', width=10, height=2,
bg='black', fg='white')
self.label01.pack()
self.label02 = Label(self, text='hebut', width=10, height=2,
bg='blue', fg='white', font=('黑体', 30))
self.label02.pack()
global photo
self.label04 = Label(self, text='hebut\n关关雎鸠', borderwidth=1, relief='groove', justify='right')
self.label04.pack()
if __name__ == '__main__':
root = Tk()
root.geometry('400x500+200+300')
app = Application(master=root)
root.mainloop()
|
上述例子中,注意pack()的用法,是tkinter中一种布局管理的方法,文章后面介绍了三种布局
options
我们可以通过 Options 设置组件的属性,从而控制组件的各种状态。比如:宽度、高度、颜色、位置等等。
1
2
3
4
5
6
7
8
9
10
11
12
13
14
15
16
17
18
19
20
21
22
| class Application(Frame):
def __init__(self, master=None):
super().__init__(master)
self.master = master
self.pack()
self.createWidget()
def createWidget(self):
fred = Label(self, text='什么?', fg="red", bg="blue")
fred["fg"] = "red"
fred["bg"] = "blue"
fred.config(fg="white", bg="blue")
fred.pack()
self.btn01 = Button(self, text="点击送花,变色")
self.btn01["command"] = self.click()
def click(self):
messagebox.showinfo("送花","送你99朵花")
self.btn01.config(fg="white", bg="black")
print(self.btn01.config())
|
print(self.btn01.config()) 可查看到options中的常用方法
Button-Entry
- Button(按钮)用来执行用户的单击操作。Button 可以包含文本,也可以包含图像。按钮被单击后会自动调用对应事件绑定的方法。
- Entry,是单行文本框
1
2
3
4
5
6
7
8
9
10
11
12
13
14
15
16
17
18
19
20
21
22
23
24
25
26
27
28
29
30
31
32
33
34
35
36
37
38
39
40
41
42
43
44
45
46
47
48
49
50
51
52
53
54
| from tkinter import *
from tkinter import messagebox
class Application(Frame):
def __init__(self, master=None):
super().__init__(master)
self.master = master
self.pack()
self.createWidget()
def createWidget(self):
self.label01 = Label(self, text="用户名")
self.label01.pack()
v1 = StringVar()
self.entry01 = Entry(self, textvariable=v1)
self.entry01.pack()
v1.set("admin")
print(v1.get())
print(self.entry01.get())
self.label02 = Label(self, text="密码")
self.label02.pack()
v2 = StringVar()
self.entry02 = Entry(self, textvariable=v2, show="*")
self.entry02.pack()
Button(self, text="登陆", command=self.login).pack()
def login(self):
username = self.entry01.get()
pwd = self.entry02.get()
print("去数据库比对用户名和密码!")
print("用户名:" + username)
print("密码:" + pwd)
if username == "关关雎鸠" and pwd == "123456":
messagebox.showinfo("学习系统", "登录成功!欢迎开始学习!")
else:
messagebox.showinfo("学习系统", "登录失败!用户名或密码错误!")
if __name__ == '__main__':
root = Tk()
root.geometry("400x130+200+300")
app = Application(master=root)
root.mainloop()
|
- 常见的组件比如Text多行文本框、Radiobutton 单选按钮、Checkbutton 复选按钮、canvas 画布等不做演示
布局管理
tkinter 提供了三种管理器:pack、grid、place。
grid 布局管理器
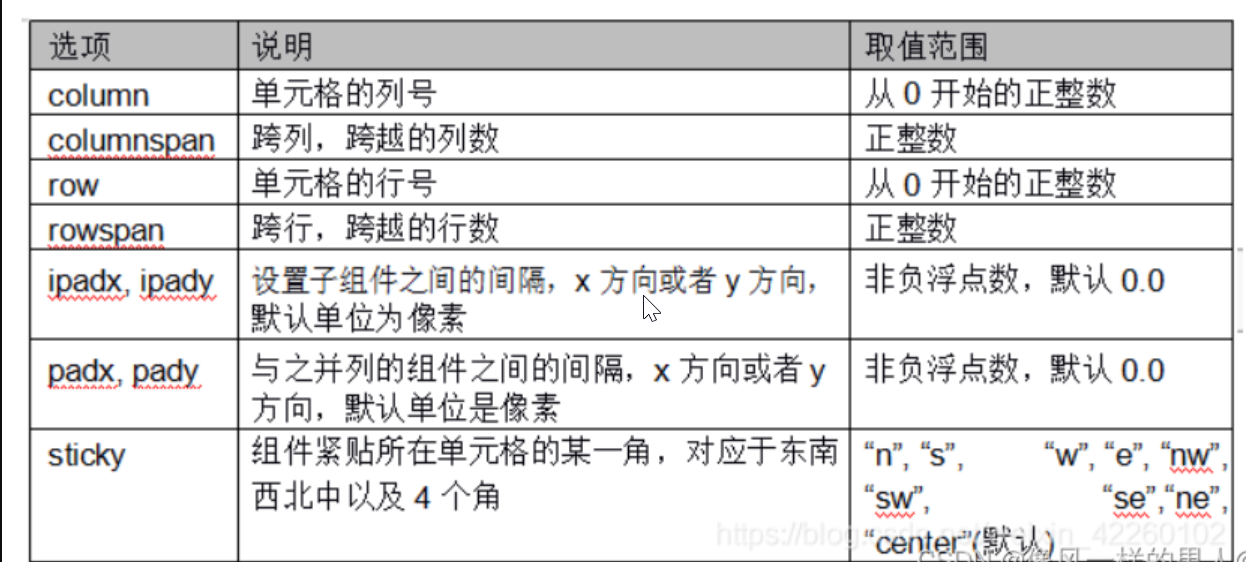
grid 表格布局,采用表格结构组织组件。子组件的位置由行和列的单元格来确定,并且可以跨行和跨列,从而实现复杂的布局。
1
2
3
4
5
6
7
8
9
10
11
12
13
14
15
16
17
18
19
20
21
22
23
24
25
26
27
|
from tkinter import *
class Application(Frame):
def __init__(self, master=None):
super().__init__(master)
self.master = master
self.pack()
self.createWidget()
def createWidget(self):
Label(self,text="用户名").grid(row=0,column=0)
Entry(self).grid(row=0,column=1)
Label(self,text="用户名为手机号").grid(row=0,column=2)
Label(self, text="密码").grid(row=1, column=0)
Entry(self, show="*").grid(row=1, column=1)
Button(self, text="登录").grid(row=2, column=1, sticky=EW)
Button(self, text="取消").grid(row=2, column=2, sticky=EW)
if __name__ == '__main__':
root = Tk()
root.geometry("400x90+200+300")
app = Application(master=root)
root.mainloop()
|

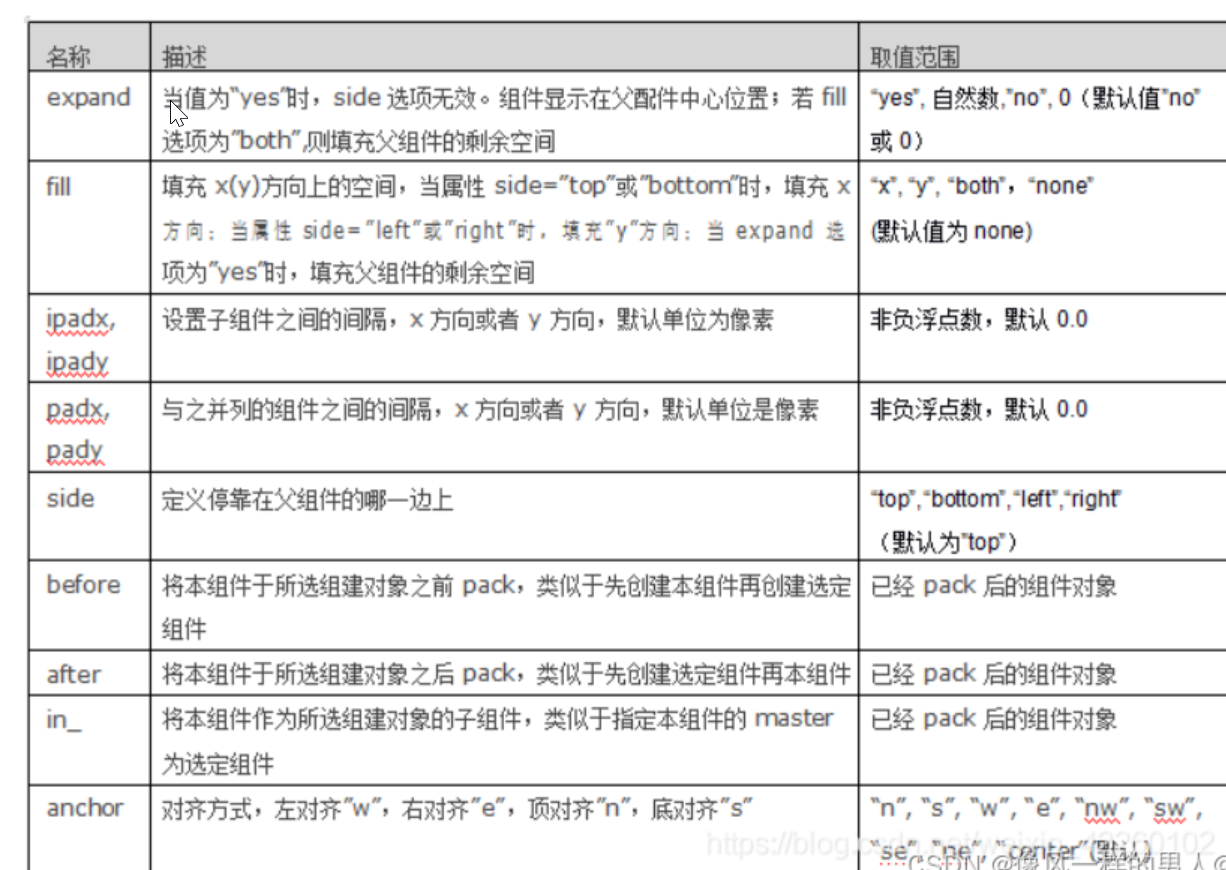
pack布局
- 三种布局中最简单的
- pack 按照组件的创建顺序将子组件添加到父组件中,按照垂直或者水平的方向自然排布。如果不指定任何选项,默认在父组件中自顶向下垂直添加组件。
1
2
3
4
5
6
7
8
9
10
11
12
13
14
15
16
17
|
from tkinter import *
root = Tk()
root.geometry("700x220")
f1 = Frame(root)
f1.pack()
f2 = Frame(root)
f2.pack()
btnText = ("流行风", "中国风", "日本风", "重金属", "轻音乐")
for txt in btnText:
Button(f1, text=txt).pack(side="left", padx="10")
for i in range(1, 20):
Button(f2, width=5, height=10, bg="black" if i % 2 == 0 else "white").pack(side="left")
root.mainloop()
|
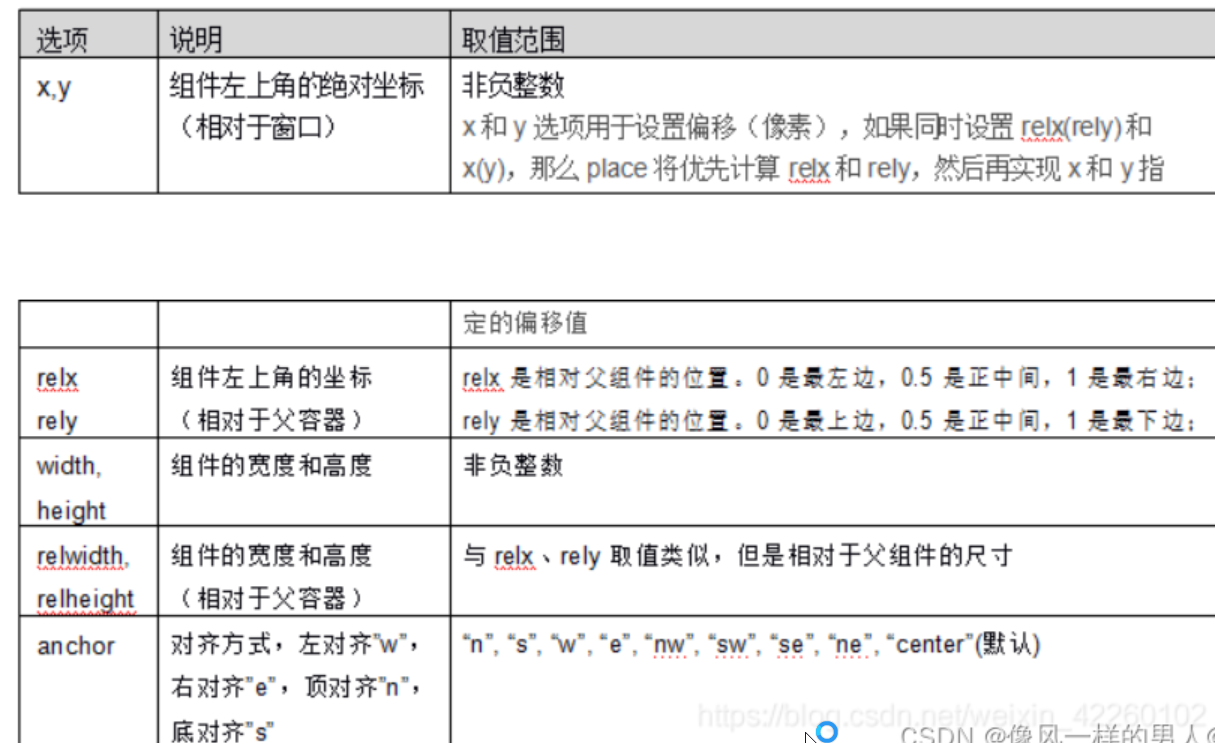
place 布局管理器
place 布局管理器可以通过坐标精确控制组件的位置,适用于一些布局更加灵活的场景
1
2
3
4
5
6
7
8
9
10
11
12
13
14
15
16
| from tkinter import *
root= Tk()
root.geometry("500x300")
root.title("布局管理 place")
root["bg"]="white"
f1= Frame(root,width=200,height=200,bg="green")
f1.place(x=30,y=30)
Button(root,text="hebut").place(relx=0.5,rely=0,x=100,y=200,relwidth=0.2,relheight=0.2)
Button(f1,text="programmer").place(relx=0.6,rely=0.7)
Button(f1,text="关关雎鸠").place(relx=0.2,rely=0.2)
root.mainloop()
|
打包
1
2
3
4
5
6
7
8
9
10
11
12
13
14
15
16
17
18
19
20
21
22
23
24
25
26
27
28
29
30
31
32
33
34
35
36
37
38
39
40
41
42
43
44
45
46
47
48
49
50
51
52
53
54
55
56
57
|
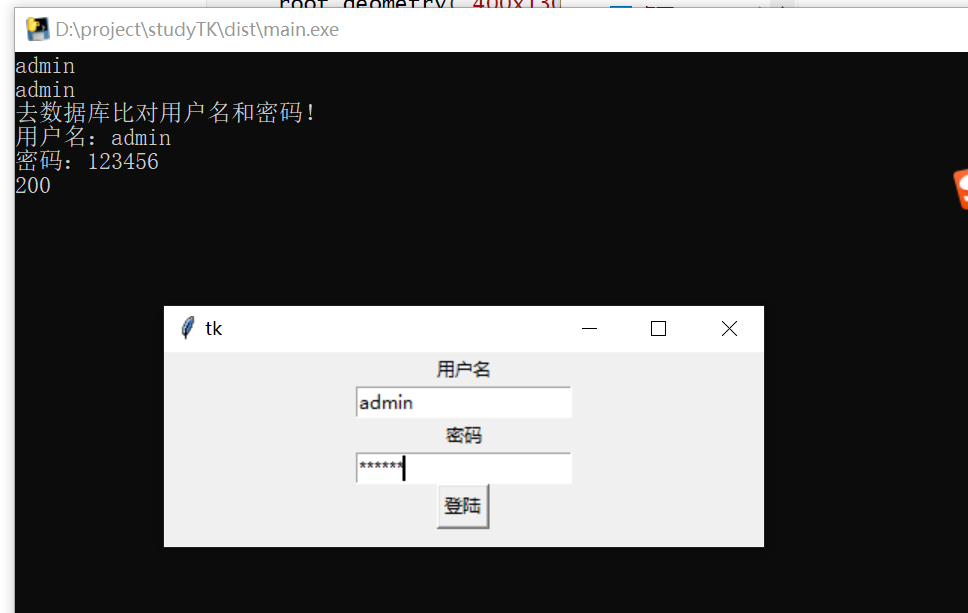
from tkinter import *
from tkinter import messagebox
import requests
class Application(Frame):
def __init__(self, master=None):
super().__init__(master)
self.master = master
self.pack()
self.createWidget()
def createWidget(self):
self.label01 = Label(self, text="用户名")
self.label01.pack()
v1 = StringVar()
self.entry01 = Entry(self, textvariable=v1)
self.entry01.pack()
v1.set("admin")
print(v1.get())
print(self.entry01.get())
self.label02 = Label(self, text="密码")
self.label02.pack()
v2 = StringVar()
self.entry02 = Entry(self, textvariable=v2, show="*")
self.entry02.pack()
Button(self, text="登陆", command=self.login).pack()
def login(self):
username = self.entry01.get()
pwd = self.entry02.get()
print("去数据库比对用户名和密码!")
print("用户名:" + username)
print("密码:" + pwd)
if username == "admin" and pwd == "123456":
messagebox.showinfo("学习系统", "登录成功!欢迎开始学习!")
res = requests.get("http://www.baidu.com")
print(res.status_code)
else:
messagebox.showinfo("学习系统", "登录失败!用户名或密码错误!")
if __name__ == '__main__':
root = Tk()
root.geometry("400x130+200+300")
app = Application(master=root)
root.mainloop()
|
1
| pip install pyinstaller -i https://pypi.tuna.tsinghua.edu.cn/simple
|
1
| D:\project\studyTK>pyinstaller -F main.py
|
- 执行命令完成后,在dist目录就发现了打包好的exe文件,运行即可