0%

airtest多机并行设计解析

说明

前文介绍了aritest自动化测试框架设计,这次分析下如何设计多机并行,本次测试是安卓手机,雷电模拟器和真机,谷歌浏览器

多机安卓

配置文件

  • setting.yml

  • 和前文配置差不多,加了个boot=multi

    • 只要设置此指,就会读取下面的值,里面给不同设备指定了不同模块

      1
      2
      [multi]
      test_case = [{"dev":"ZL9LC685V86DNNMN","test_module": ["我的"],"phone":"真机1"}, {"dev":"emulator-5554","test_module":["他的"],"phone":"雷电"}]
1
2
3
4
5
6
7
8
9
10
11
12
13
14
15
16
17
18
19
20
21
22
23
24
25
26
27
28
29
30
31
32
33
34
35
[default]
# 包名
pkg = com.jianshu.haruki
# 手机名字
phone=雷电模拟器
# 设备连接名字
dev_connect=Android://127.0.0.1:5037/
# 设备id,adb devices 获取,如果启动多设备,这里无效
dev=emulator-5554
# 用例目录
root_path=E:\proj\airtest_auto\air_case\android
# test_plan=1 表示调试用例需要配合test_module使用,0表示全部用例;如果启动多设备,test_plan默认为0,设置1也无效
test_plan=1
test_module=["他的"]
# false|true 表示是否运行用例之前,删除log文件夹,删除后会影响查看历史报告
remove_log=true
# false|true 是否开启录屏,若传true就会自动录屏,但是在模拟器上录屏失败,只使用于真机
recording=false
# android|ios|web,当填如web时,需要填写驱动文件位置
platform =android
# driver_path=E:\proj\airtest_auto\exe\chromedriver.exe
driver_path=
# 服务器信的信息,比如本地的ip,用来展示报告
report_host=172.31.105.196
# 本地服务器路径,我把源代码中的report也放在里面了
local_host_path=E:\proj\aritest
# 本地服务器端口
local_host_port=8000
# 启动什么模式,单机和多机
# 如果指定multi就是多机并行,读取multi的配置,否则就为单机模式
boot=multi
[multi]
# 给不同的设备分配测试模块,dev中的设备id一定要填对
test_case = [{"dev":"ZL9LC685V86DNNMN","test_module": ["我的"],"phone":"真机1"}, {"dev":"emulator-5554","test_module":["他的"],"phone":"雷电"}]
#test_case = [{"dev":"emulator-5554","test_module":["他的"],"phone":"雷电"}]

代码分析

使用 pool = Pool() pool.map(self.run_case1, data["test_case"])达到多进程并行设备

1
2
3
4
5
6
7
8
9
10
11
12
13
14
15
16
17
18
19
20
21
22
23
24
25
26
27
28
29
30
31
32
33
34
35
36
37
38
39
40
41
42
43
44
45
46
47
48
49
50
51
52
53
54
55
56
57
58
59
60
61
62
63
64
65
66
67
68
## runner3.py

# 启动入口代码,和之前单机一样,读取配置文件
def run_case(data):
...
test = CustomAirtestCase(data["root_path"], data["dev_connect"])
test.run_air(data)

def run_air(self, data):
self.recording = data["recording"]
self.report_host = "http://" + data["report_host"] + ":" + data["local_host_port"]
# 开启本地http服务器
threading.Thread(target=HttpServer.start, args=(),
kwargs={"local_host_path": data["local_host_path"], "report_host": data["report_host"],"port": data["local_host_port"]}).start()

# 整个用例开始执行时间
start_time = datetime.now().strftime("%H:%M:%S")
pool = Pool()
pool.map(self.run_case1, data["test_case"])
...
# 记录数据采用放到json文件中
test_modules_dev = Runner3Common.get_case_module_dev(PATH("config/case_data.json"))
print("==设备=%s" % test_modules_dev)
Runner3Common.set_result_summary_json({"total_time": total_time, "phone": test_modules_dev["test_dev"], "modules": test_modules_dev["test_modules"]})

# 不同的手机执行不同模块用例
def run_case1(self, data_item):
_dev = data_item["dev"]
# 记录测试设备
Runner3Common.set_case_module_dev({"test_dev": _dev})
# 记录测试模块
for i in data_item["test_module"]:
# 获取到用例列表
get_case_data = Runner3Common.get_cases(data_item, _dev, self.root_path)
for i in get_case_data:
air_device = [self.dev_connect + _dev] # 取设备
# 执行用例
run(root_dir=self.root_path, test_case=i, device=air_device, local_host_path=self.local_host_path,log_date=self.log_date,
recording=self.recording, report_host=self.report_host, phone=data_item["phone"])

# 执行用例这里代码和单机的代码相差不多,把 rpt = report.LogToHtml这里生成日志文件代码写在了这里
def run(root_dir, test_case, device, local_host_path, log_date, recording, report_host, phone):
script = os.path.join(root_dir, test_case["module"], test_case["case"])
log_host_path = os.path.join(test_case["module"], test_case["case"].replace('.air', ''))
log = os.path.join(local_host_path, log_host_path)
os.makedirs(log)
print(str(log) + ' 创建日志文件成功')
output_file = os.path.join(log, 'log.html')
args = Namespace(device=device, log=log, compress=None, recording=recording, script=script, no_image=None)
# 用例开始执行日期
st_date = datetime.now().strftime("%Y-%m-%d %H:%M:%S")
# 用例开始执行时间
s_time = datetime.now().strftime("%H:%M:%S")
try:
run_script(args, AirtestCase)
is_success = True
except:
is_success = False
end_date = datetime.now().strftime("%Y-%m-%d %H:%M:%S")
# 用例结束执行时间
e_time = datetime.now().strftime("%H:%M:%S")
# 用例耗时时间
sum_time = get_case_total_time(s_time, e_time)
# 生成测试用例的详情报告
rpt = report.LogToHtml(script, log, report_host + "/report",
log_host=report_host + "/log/" + log_date + "/" + log_host_path)

rpt.report("log_template.html", output_file=output_file)

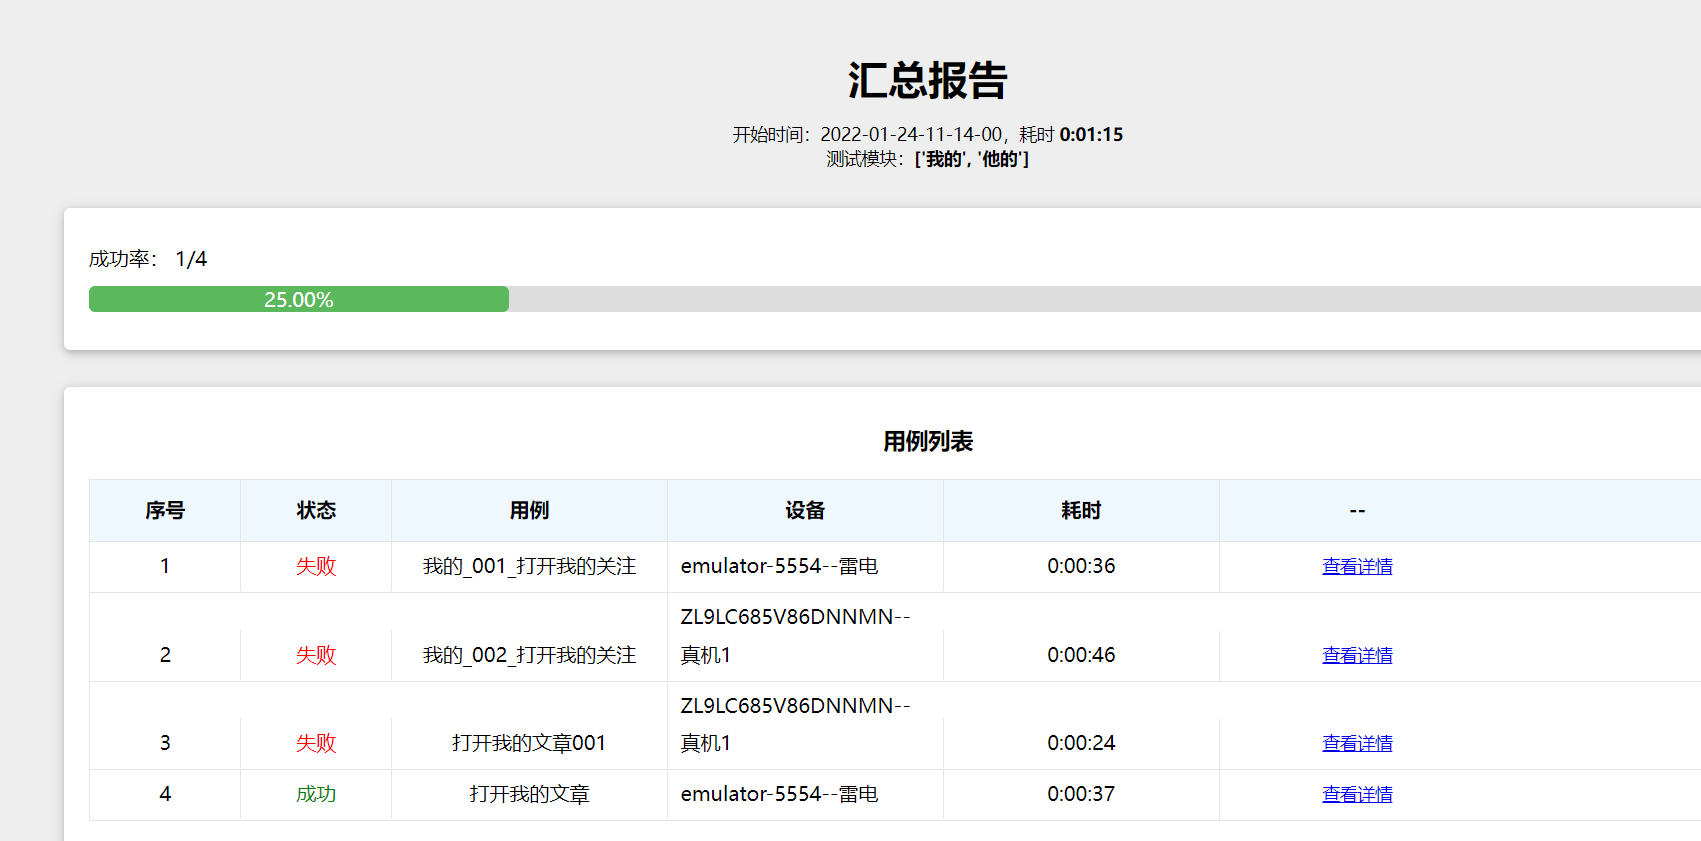
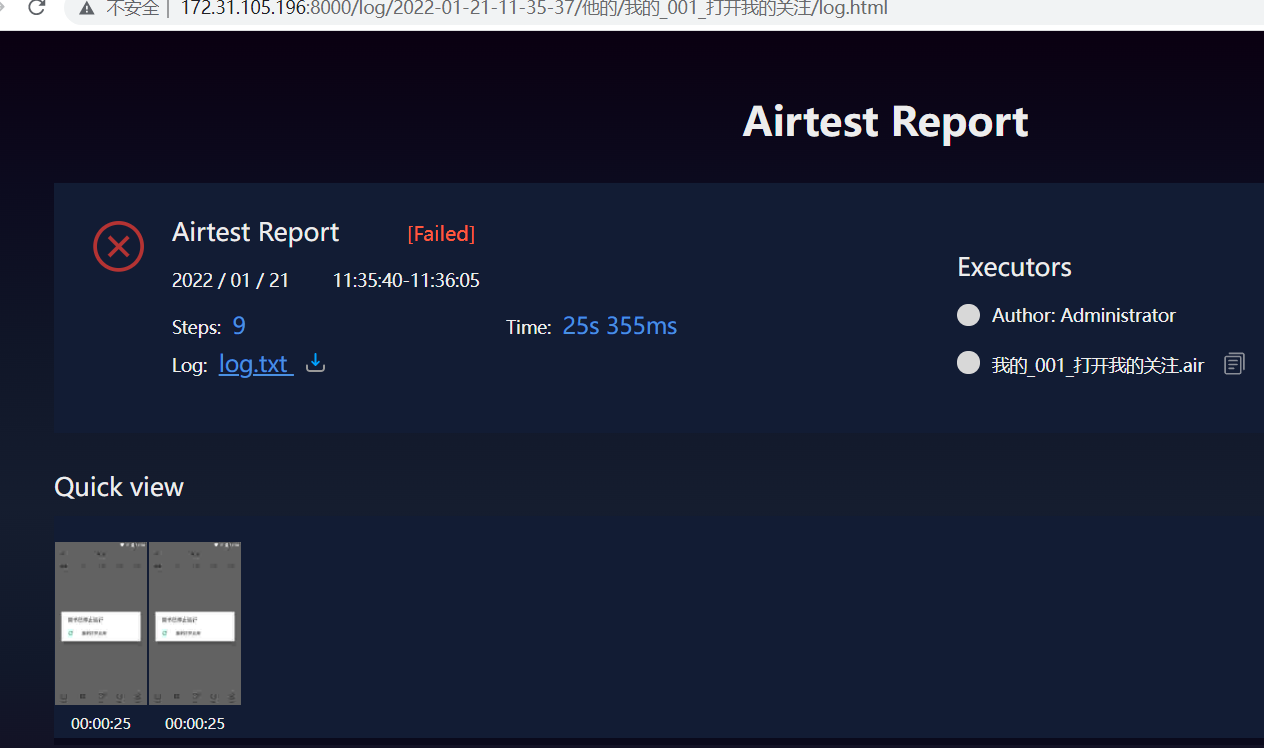
测试结果

image-20220121115858698

  • 测试结果的列表页面,优化了下页面

image-20220124111600060

image-20220121120048939

关键字驱动

  • airtest中也能实现关键字驱动?当然也可以
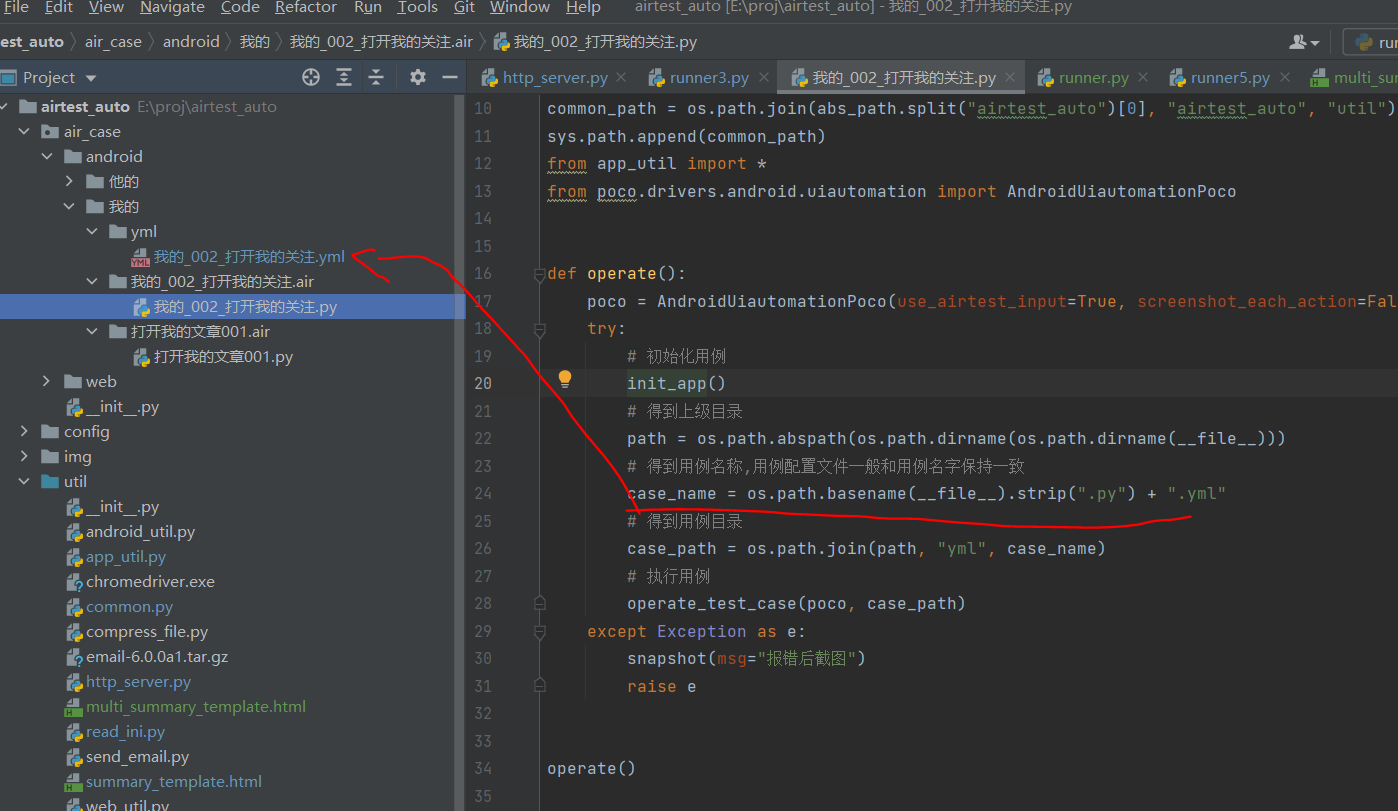
  • 用例调用逻辑

image-20220124112127781

  • yml中的用例格式
1
2
3
4
5
- poco(text="取消").click() if poco(text="取消").exists() else print("")
# 点击我的关注
- poco("com.jianshu.haruki:id/tv_guanzhu").click()
# 点击动态下最近更新的作者第一条数据
- poco("com.jianshu.haruki:id/userIcon").click()
  • 解析yml中的用例,知道此逻辑后,可以定义任意关键字
1
2
3
4
5
6
7
8
9
10
11
12
13
14
15
16
17
18
19
20
21
22
23
24
25
26
27
28
29
30
31
32
33

def operate_test_case(poco, yml):
"""
读取yml用例文件,执行用例
:param poco:
:param yml:
:return:
"""
handing_error(poco)
with open(yml, encoding='utf-8') as f:
d = yaml.safe_load(f)
# 启动应用后的容错
for i in d:
# 寻找关键字click
event_click = i.split(".click()")
# 寻找关键字if
event_if = i.split("if")
print("元素为:%s" % i)
print("操作元素开始时间:%s" % datetime.now().strftime("%Y-%m-%d %H:%M:%S"))
# 非if语句的click事件
if len(event_click) > 1 and len(event_if) == 1:
# 利用eval把字符串转换为函数,每次点击之前智能等待
eval(event_click[0] + ".wait_for_appearance(5)")
# 执行用例
eval(i)
else:
# 其他的poco事件
sleep(2)
eval(i)
print("操作元素结束时间:%s" % datetime.now().strftime("%Y-%m-%d %H:%M:%S"))

# 操作元素后的容错
handing_error(poco)
  • 如果有写逻辑比较复杂,不适合写到yml中,可以混合使用,比如下面这样写用例:
1
2
3
4
5
6
7
8
9
10
11
12
13
14
15
16
17
18
19
20
21
22
23
24
def operate():
poco = AndroidUiautomationPoco(use_airtest_input=True, screenshot_each_action=False)
try:
# 初始化用例
init_app()
poco(text="取消").click() if poco(text="取消").exists() else print("")


case_path = os.path.join(path, "yml", "xxx")
operate_test_case(poco, case_path)

# 点击我的
poco("com.jianshu.haruki:id/tv_more_menu").wait(5).click()
# 点击我的文章
poco(text="我的文章").wait(5).click()
# 向上滑动
poco("com.jianshu.haruki:id/refresh_view").focus([0.5, 0.5]).swipe([0.5, -0.5])

case_path = os.path.join(path, "yml", "oooo")
operate_test_case(poco, case_path)

except Exception as e:
snapshot(msg="报错后截图")
raise e

多机web

  • 代码逻辑几乎一样,只是把Namespace方法中的devicec传为None
1
2
3
4
5
6
   if device == "web":
air_device = None
else:
air_device = [dev_connect + device]
...
args = Namespace(device=air_device, log=log, compress=None, recording=recording, script=script, no_image=None)
  • 配置文件略有不同
1
2
3
4
5
6
7
8
9
10
11
12
# setting1.yaml
[default]
# 手机名字
phone=谷歌浏览器

# android|ios|web,当填如web时,需要填写驱动文件位置
platform =web
driver_path=E:\proj\airtest_auto\util\chromedriver.exe

[multi]
# 如果是web测试,dev一定要填web
test_case = [{"dev":"web","test_module": ["home"],"phone":"谷歌浏览器1"}, {"dev":"web","test_module":["home2"],"phone":"谷歌浏览器2"}]
  • 用例编写
1
2
3
4
5
6
7
8
9
10
11
12
13
14
15
16
17
18
19
20
21
22
23
# -*- encoding=utf8 -*-
from airtest.core.api import *
import sys
# pip3 install pynput
# pip3 install airtest-selenium
# 得到绝对路径

abs_path = os.path.abspath(os.path.dirname(__file__))
# 得到公共用例目录
common_path = os.path.join(abs_path.split("airtest_auto")[0], "airtest_auto", "web_util")
sys.path.append(common_path)
from web_util import *

driver = get_driver()
try:
driver.get("http://www.baidu.com")
driver.find_element_by_id("kw").send_keys("test")
driver.find_element_by_id("su").click()
except Exception as e:
snapshot(msg="报错后截图")
raise e
finally:
driver.close()
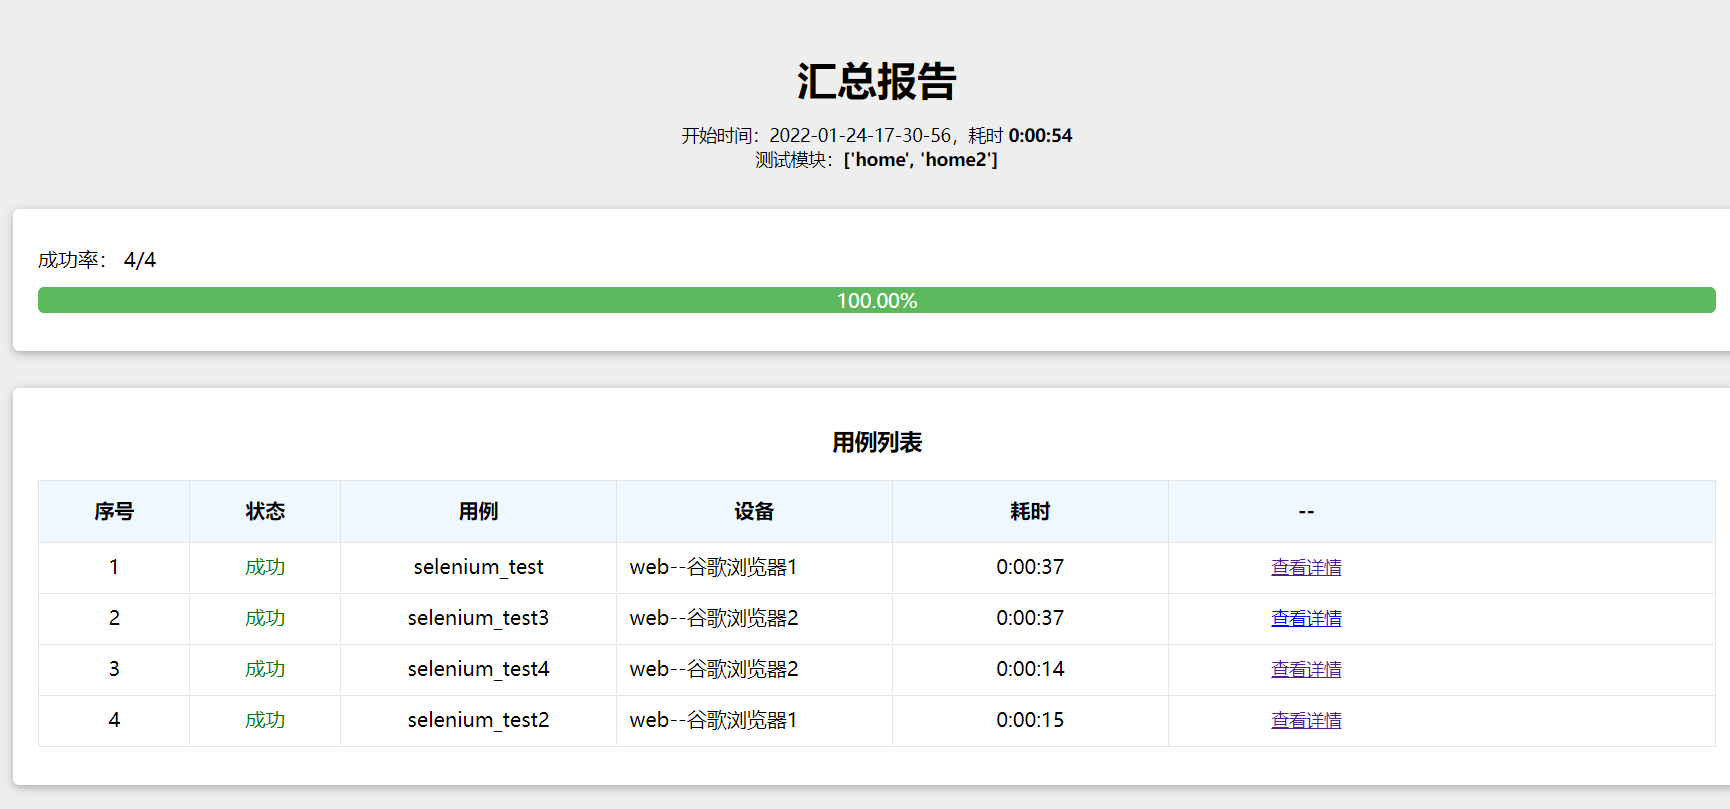
  • 测试结果

image-20220124173817575

总结

  • 还有一种最优方案是,后台有个监控任务,不停的读取用例队列,每台手机运行20条用例(可设置)多台并行,手机(设备)不够就等待,手机有空闲后,分配用例队列中的用例,直到用例全部分配完毕。